7 best tools for tracking app user behavior
One of the inherent downsides of black box testing is ensuring thorough test coverage.
After all, this method doesn’t rely on examining the app code, so how can you be sure everything has been thoroughly tested?
To truly succeed, it’s important to understand the different black box testing techniques, each designed to target app issues from a specific angle.
The right techniques can significantly boost your testing efficiency and maximize defect detection.
In this article, we will explore six commonly used black box testing techniques that you should know about.
Table of Contents
First off, we have equivalence partitioning, also known as equivalence class partitioning.
As illustrated in the image below, this method involves dividing all possible input data into groups called partitions or “classes,” which are categorized as either valid or invalid.
We then select a few representative inputs from each partition to test the system and verify whether the application’s output aligns with our expectations.
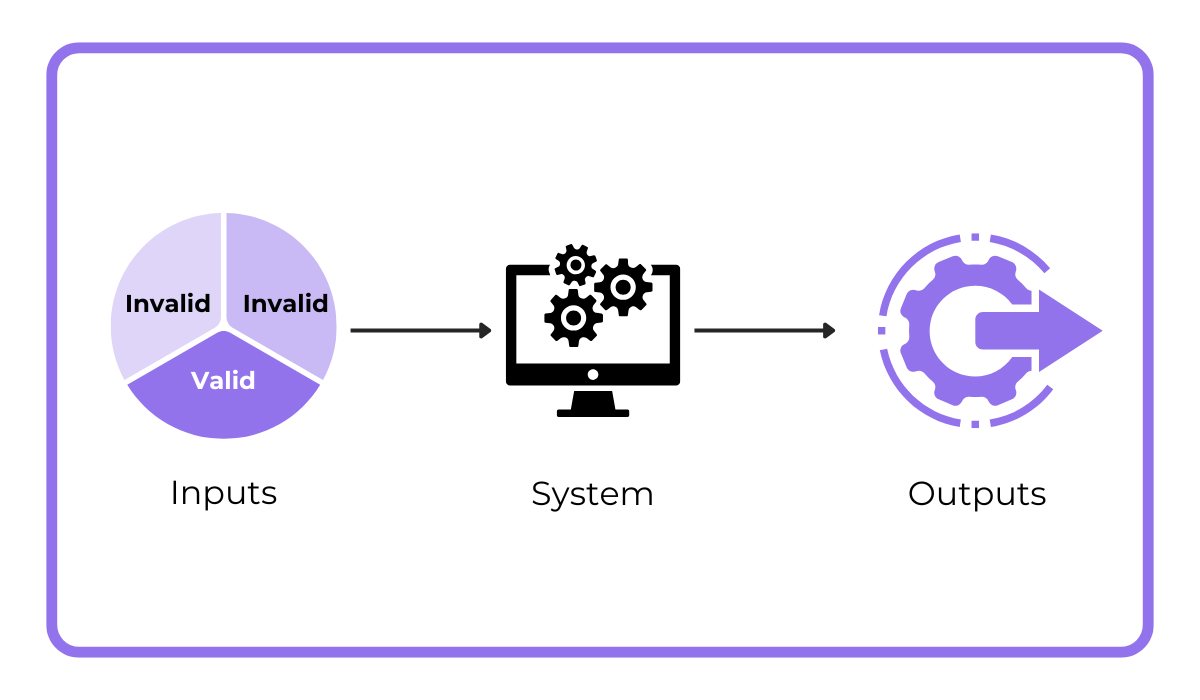
Simply put, this black box testing technique aims to reduce the number of test cases required.
But, at the same time, it aims to maintain effective test coverage.
The core idea is that if one test case within a partition reveals a defect, other test cases in the same partition are also likely to uncover the same defect.
Conversely, if a test case in a partition produces the expected result, it’s assumed that other test cases within that partition would also pass.
Let’s illustrate this with an example.
Imagine an online store where customers can enter a discount code, such as “SAVE20,” during checkout to receive a 20% discount on their order.
In this scenario, we can define several partitions, as shown in the table below.
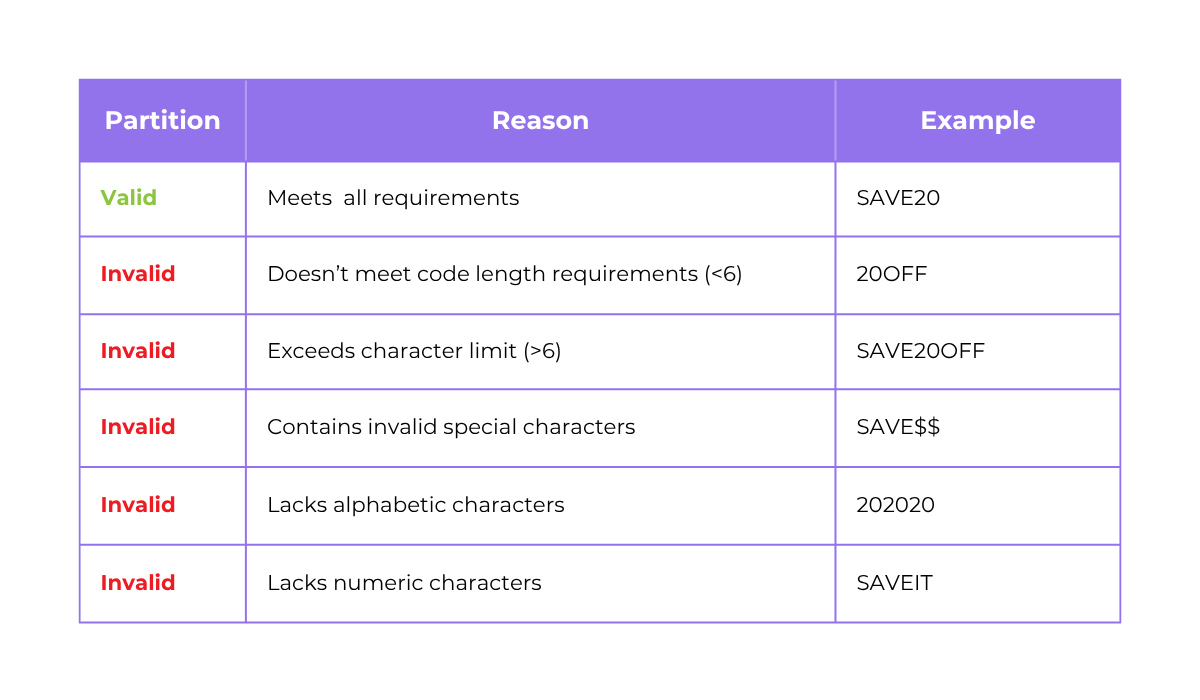
As you can see, there’s only one valid input to obtain the discount, but there are numerous potential invalid inputs.
With equivalence partitioning, instead of testing thousands of different discount codes, we can efficiently test for invalid classes by selecting a single representative input from each class.

Get unreal data to fix real issues in your app & web.
This means we might choose one code that’s too short, too long, consisting only of numbers, or containing an invalid special character, such as “SAVE$$.”
By testing one input from each class, we gain confidence that the system correctly handles all inputs belonging to that class.
Plus, while this technique significantly reduces the testing effort, it does so without compromising the effectiveness of defect detection.
That makes it a great black box testing tool to have.
For a technique that works really well with equivalence partitioning, let’s look at boundary value analysis (BVA).
BVA focuses on testing the values at the edges of input ranges—just below, on, and just above the boundaries.
So, for an input range of 1 to 100, the boundary values would be the minimum and maximum of this range, as shown below.
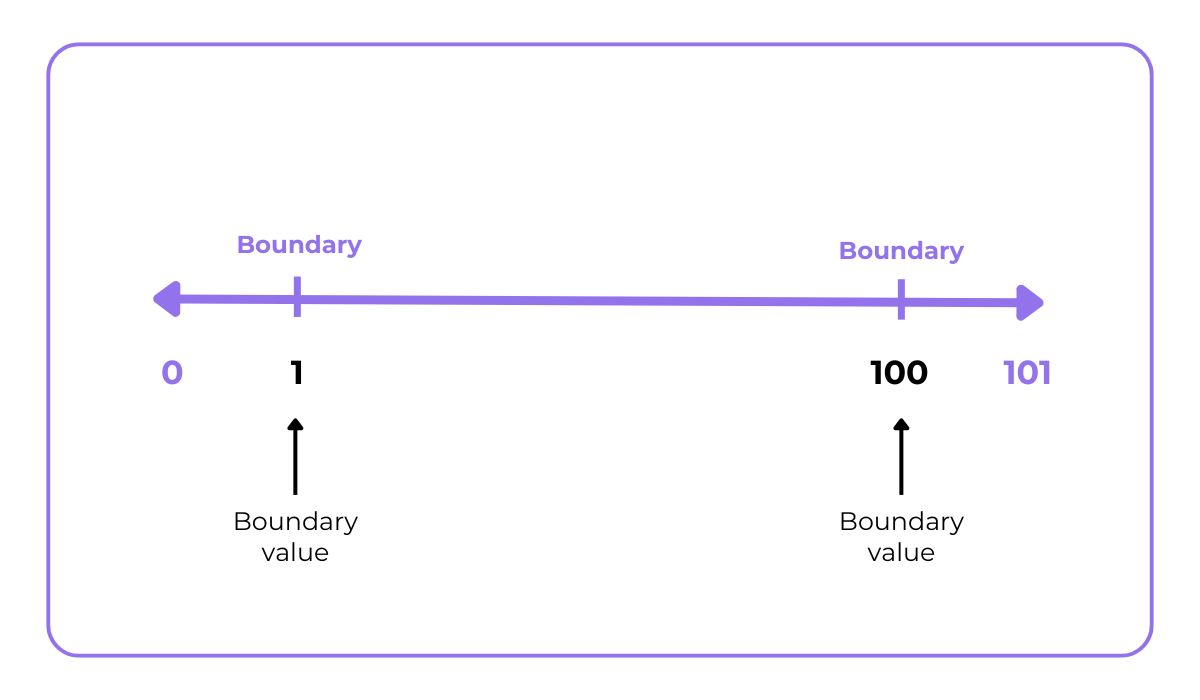
During testing, the values surrounding these would be tested as well.
Since bugs often occur at these boundary limits, this technique is effective for catching edge case errors.
Let’s illustrate this with a concrete example.
Say we’re testing an age field that accepts values from 18 to 67.
In this case, all the values that would be tested with BVA are shown in the table below.
| Test Case | Explanation | Values | Expected Result |
| Invalid | Below the lower boundary | 17 | Rejected |
| Valid | Lower boundary | 18 | Accepted |
| Valid | Above the lower boundary | 19 | Accepted |
| Valid | Just below the upper boundary | 66 | Accepted |
| Valid | Upper boundary | 67 | Accepted |
| Invalid | Above the upper boundary | 68 | Rejected |
Testing the edge values (18 and 67) is important for checking whether the app not only accepts the values between these, but also these inputs—a simple but important distinction.
There should also be a valid output for the values just within the boundaries (19 and 66), and an invalid output for the values just outside the range (17 and 68).
By testing these boundary values, we ensure that the application correctly handles inputs at the extremes of the acceptable range and rejects inputs that fall outside of it.
This helps prevent errors and ensures that the application behaves as expected.
Of course, like all the techniques covered in this article, BVA has its pros and cons, illustrated in the next image.
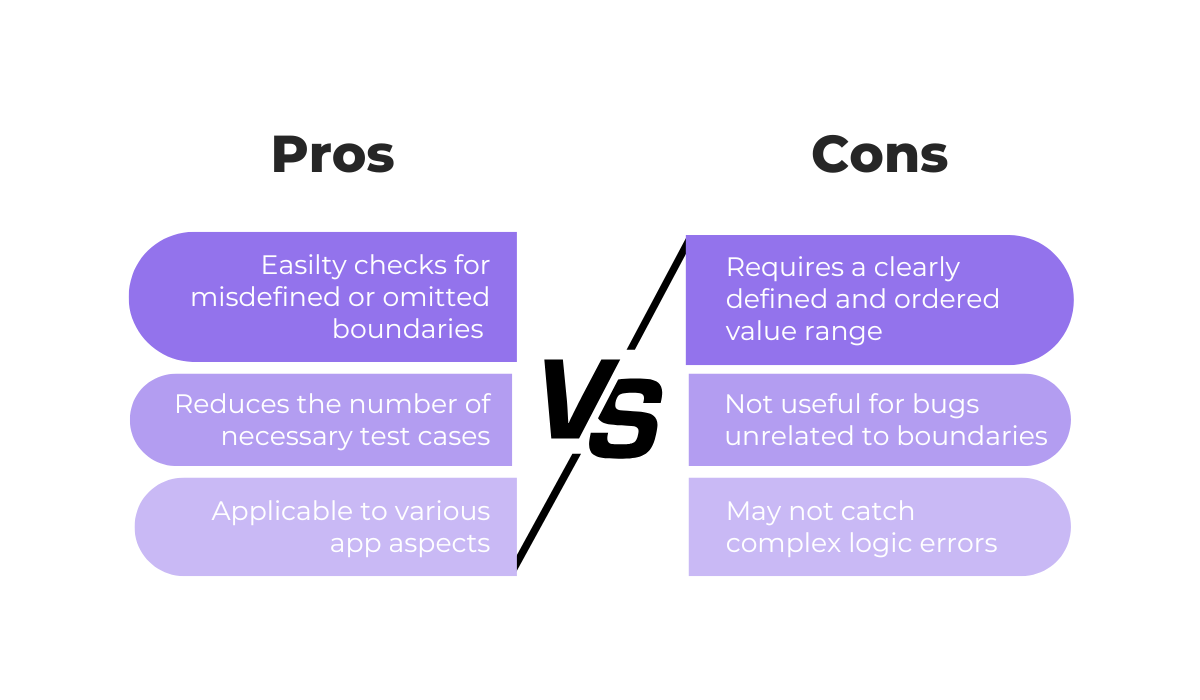
In essence, BVA is a quick way to check the boundaries of functionalities that use numerical values.
While it’s not as useful for more complex scenarios and those where boundaries may not be present, these disadvantages are mitigated when it’s used in combination with other techniques like equivalence partitioning.
This is because equivalence partitioning helps identify representative values within the valid and invalid input ranges, while BVA focuses specifically on the boundaries of those ranges.
So, it’s a valuable technique to have in your testing toolkit, especially when combined with other methods.
Next up, we have decision table testing, a technique best suited for testing more complex software scenarios.
As the name suggests, this method uses a table to represent all possible input combinations and their corresponding outputs or actions.
Consider the following example.
Imagine you have an app feature that can only be accessed by active accounts with security clearance.
In this case, you’d want to check if the app correctly grants access when these conditions are met, and denies it when one or more of the conditions aren’t met.
A snippet of how this table might look is shown below.
| Condition | Input 1 | Input 2 | Input 3 |
| User logged in | Y | Y | Y |
| Account active | Y | N | Y |
| Security clearance given | Y | N | N |
| Result | Access granted | Access denied | Acces denied |
In essence, when using this table, we consider whether the user is logged in as an initial step, whether their account has an active status, and check the user’s security clearance.
When all three conditions are met, the user is granted access. Otherwise, access is denied.
A benefit of decision table testing is that it simplifies lengthy input combinations or conditions and clearly defines the expected results.
Plus, it’s especially useful when business rules or logical conditions are complex, as it ensures that all combinations of conditions are considered and tested.
While our example is simple, decision table testing really shines in situations where multiple results—not just a valid or invalid one—are based on which rules are met and to what extent.
As Andrew Schiano, senior software testing manager at Zebra Technologies, explains, decision tables help clarify and focus testing efforts and test case creation.
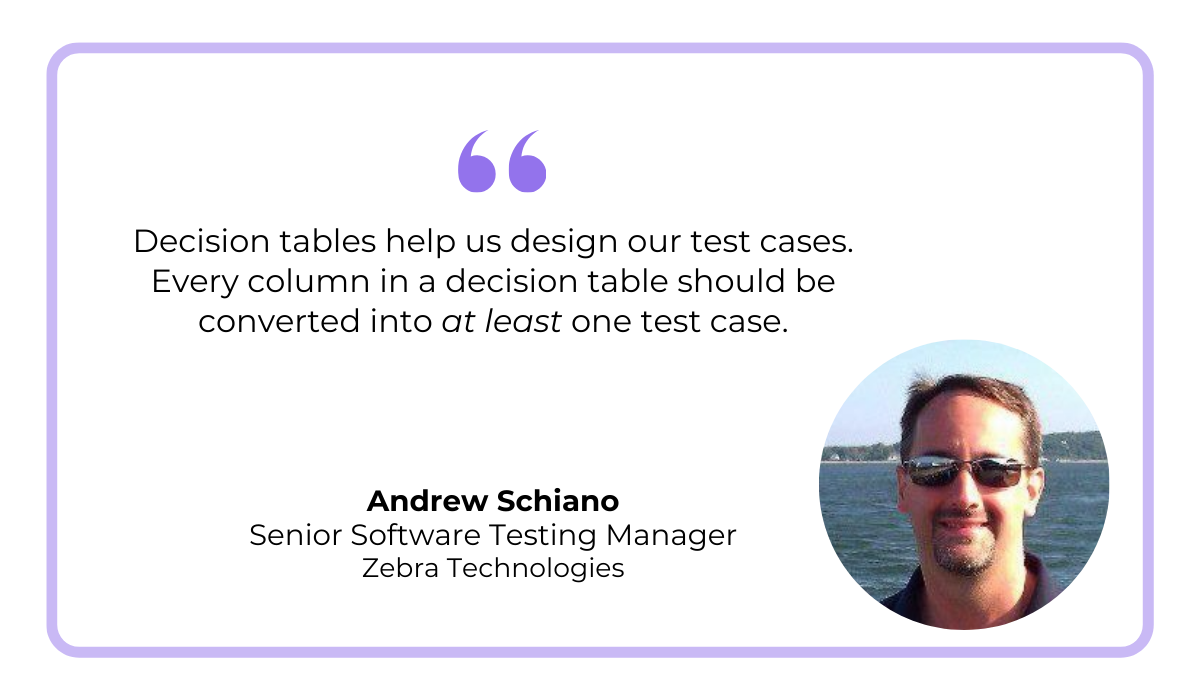
With every column in a decision table translating to a test case, you can easily determine whether the specific combination of conditions produces the expected result.
He also mentions that regardless of whether a test case passes or fails, the test results are easily presentable to stakeholders, as everyone can clearly see which set of conditions the test relates to.
Ultimately, this helps decision-making by providing a clear and concise overview of the application’s behavior under different conditions.
It allows testers to quickly identify potential issues and make informed decisions about the next steps.
The fourth technique on our list is state transition testing.
This technique is used to test how a system behaves as it moves between different states, ensuring that valid transitions occur as expected and invalid transitions are handled correctly.
Take a common login functionality.
For security reasons, many systems have a limit on incorrect login attempts, after which the system can lock the account and require a password reset or other measures.
Take a look at the image below to see what this would look like for an app where three failed login attempts are allowed.
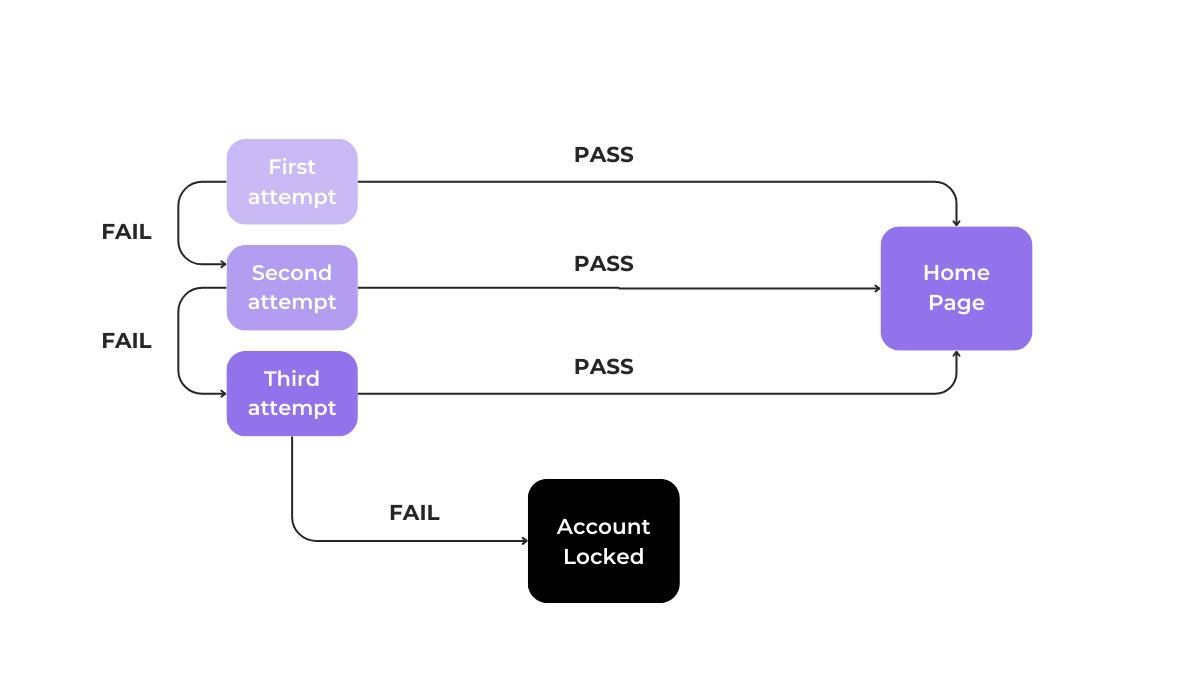
It’s crucial that all these states are valid and tracked accurately because they directly impact the app.
For example, if the system doesn’t correctly transition to the “Account Locked” state after three failed attempts, it could create a security vulnerability.
With this technique, test cases are created to verify both valid and invalid state changes.
In our login functionality example, we would test scenarios such as:
Of course, as you can see below, state transition testing is recommended in a limited set of scenarios:
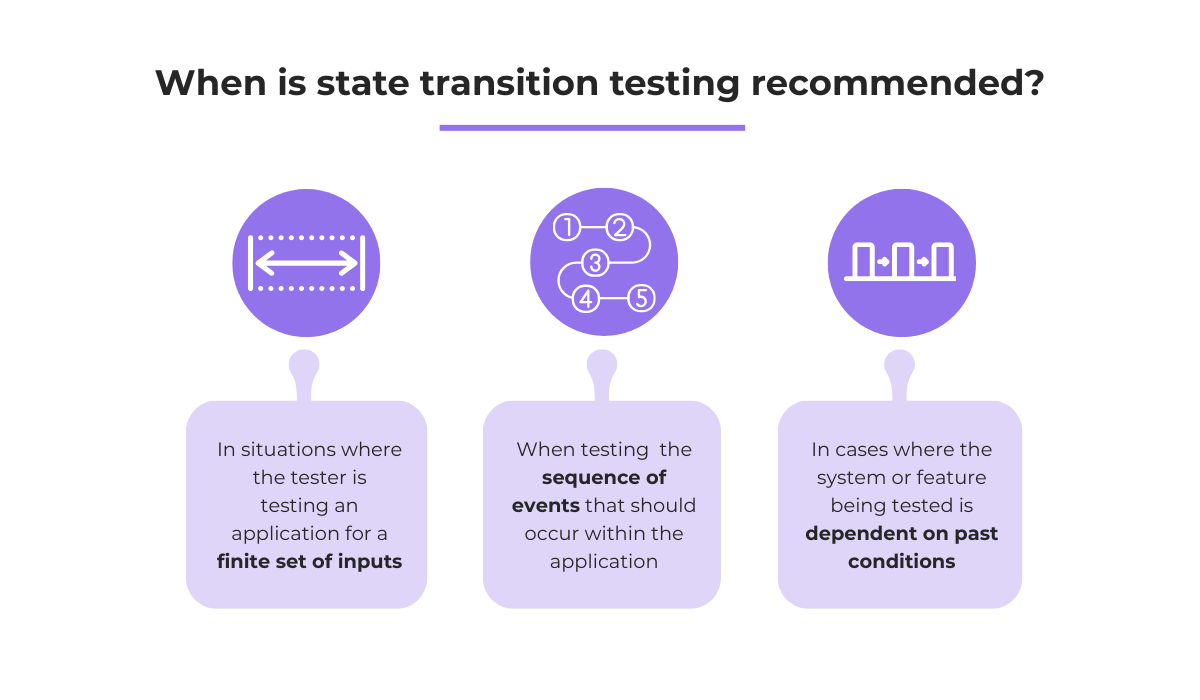
But, because many aspects of an application involve sequences of actions or states, state transition testing is a valuable technique for ensuring that these sequences function correctly.
On the other hand, in instances where sequential input conditions are not being tested or more complex functionalities are explored, other techniques should be used instead.
For a technique focused on the end-user, we have use case testing.
In this type of black box testing, the specific tests are focused on single app use cases or concrete workflows.
These use cases ultimately depend on and differ based on the type of user interacting with an app.
Let’s take a hypothetical library app as an example.
The image below shows different end-users, also known as “actors,” and the different use cases they’d have.
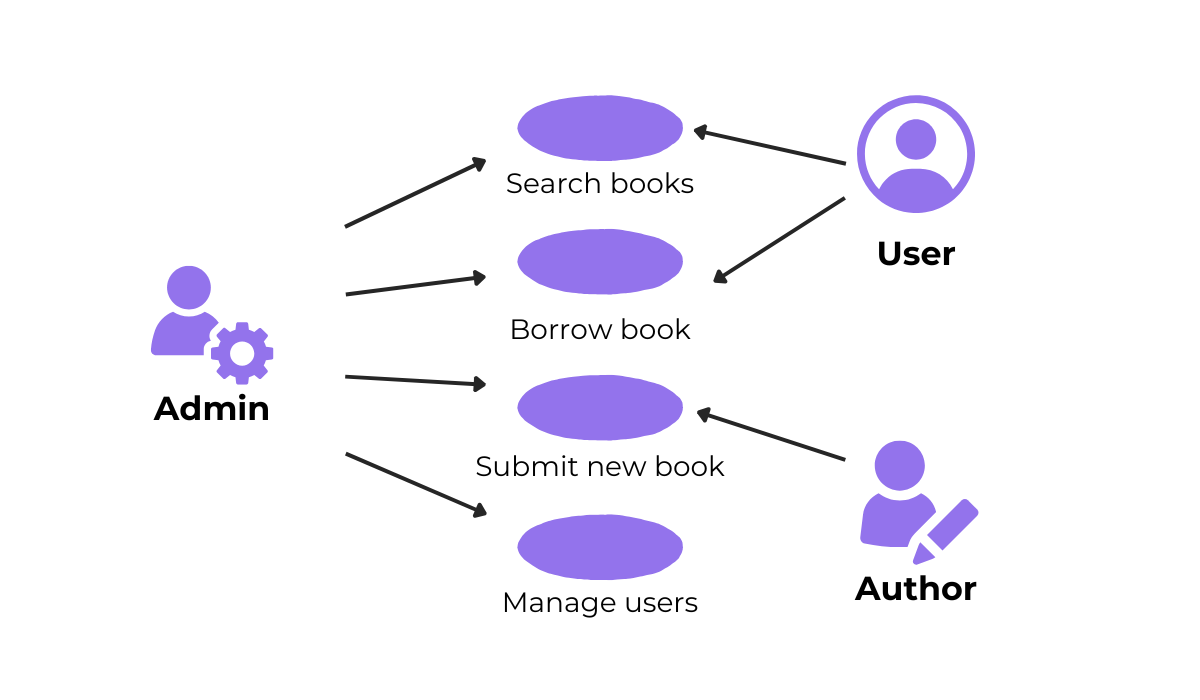
Of course, there can be some common use cases for most actors, like, for example, the login functionality.
But there would also be user-specific workflows, like book authors submitting a new book or the admin actor using the user management features.
How this technique works is that first, detailed documents are made for each use case.
For an app login use case, this can look like the example below.
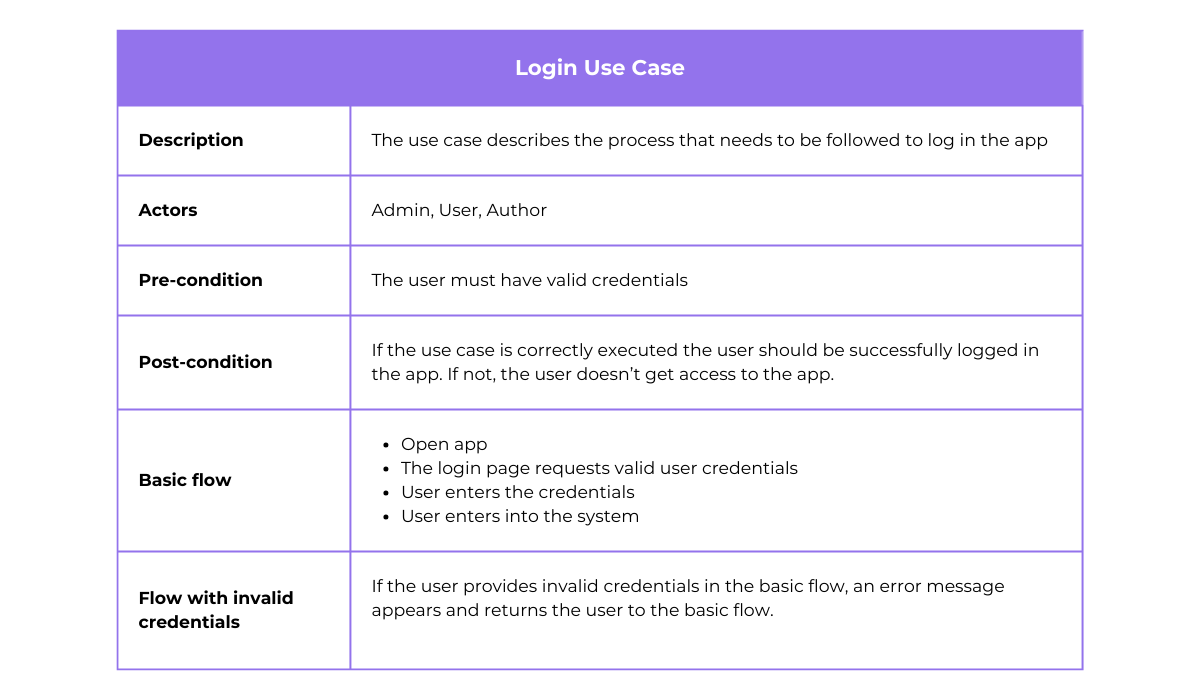
Based on this document, testers need to examine each step the user may take and ensure they are valid.
This is done by creating test cases that cover all possible paths through the use case.
That includes both the main success scenario (basic flow) and any alternative flows or error conditions.
The basic flow needs to be verified to ensure it produces the expected result.
In our login example, this would be successfully logging in with valid credentials.
Also, any alternative flows—in our case, trying to log in with invalid credentials—should also be tested.
By following the steps outlined in the use case document and testing all possible paths, testers can thoroughly verify the functionality and identify any potential issues or deviations from the expected behavior.
Capture, Annotate & Share in Seconds with our Free Chrome Extension!
In short, use case testing provides a structured approach to testing application functionality from the user’s perspective and ensures that the application meets the user’s needs.
Finally, we have a technique that relies on the experience and intuition of the testers performing it: error guessing.
This is an experience-based testing technique that falls into the same category as techniques like checklist-based testing and exploratory testing.
Once formal testing procedures have been completed, error guessing is often employed as a supplementary technique.
Why?
Because formal testing typically follows predefined test cases.
On the other hand, error guessing allows testers to explore potential issues that might not have been covered by those cases.
The tester essentially tries to anticipate potential errors based on their experience and understanding of the application.
They might ask specific questions, try unusual inputs, unexpected sequences of actions, or boundary conditions that weren’t explicitly covered in the formal test cases.
Take a look at the image below to see what testers might focus on during error guessing.
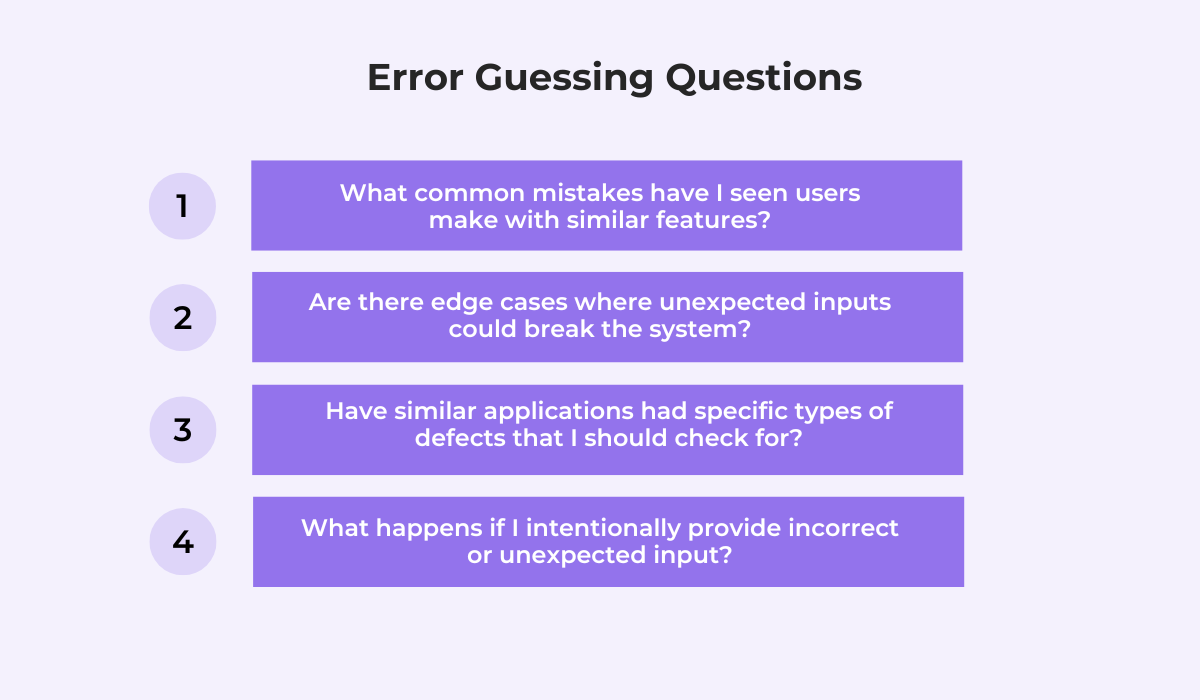
These types of questions arise from the tester’s experience and often from putting themselves in the end-users’ shoes, trying to think like them, and coming up with unexpected ways that could potentially produce an error.
This technique can uncover defects that would otherwise be impossible to find through formal testing.
Thus, the experience of the tester saves a lot of time and effort.
Of course, there are downsides to this method, too.
For starters, error guessing is fundamentally an intuitive and ad-hoc process.
So, it is very difficult to outline a well-defined procedure for this technique.
And it’s certainly not a method that inexperienced testers should use.
For this technique to succeed, it’s best to use experts who possess a combination of the aspects and characteristics shown below.
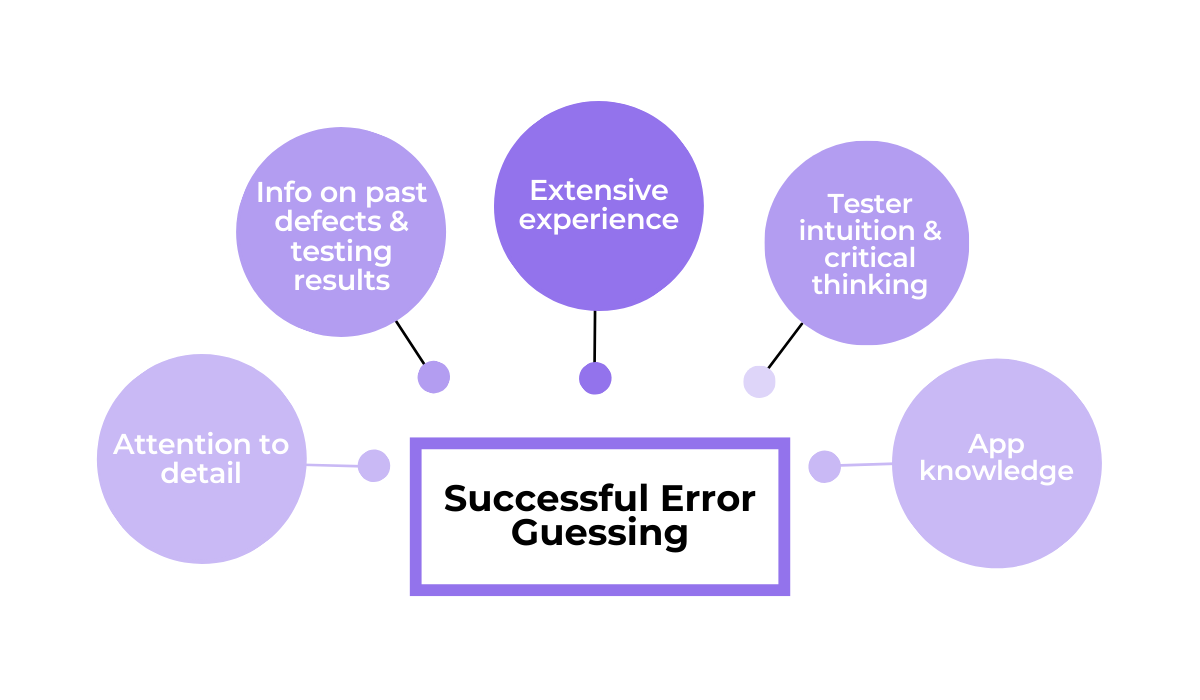
But even experienced testers should look for the right tools to enhance their effectiveness.
For instance, when testers uncover bugs during error guessing, they often need to stop what they’re doing to document the issue.
In other words, they need to switch to external reporting tools, which interrupts the testing flow.
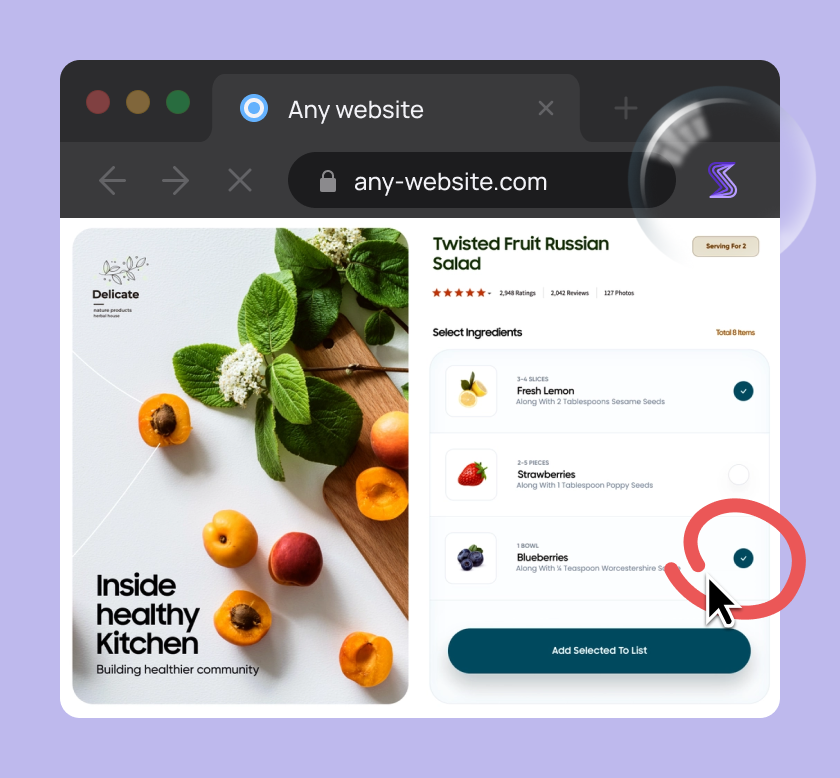
Shake solves this problem.
It allows testers to report bugs instantly, directly within the app, with a simple gesture or tap.
It also automatically collects valuable data behind the scenes, including the following:
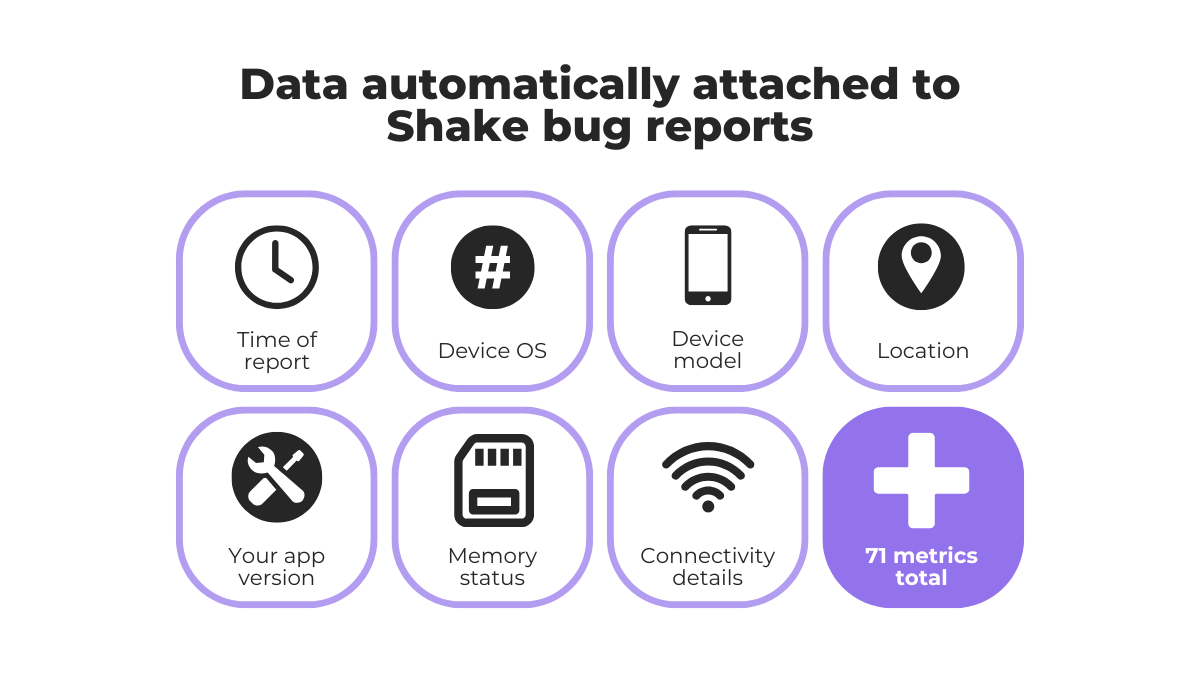
This information is attached to every bug report, giving developers a complete picture of the issue the moment it’s submitted.
On top of this, features like automatic screenshots and video recordings can help developers debug faster and more accurately, often without needing to reach back out to the tester for clarification on bug reproduction steps.
Simply put, the deep understanding of experienced testers, combined with the right tools, can help detect potential weak points and make it more likely to uncover hidden defects.
We’ve gone over six essential black box testing techniques, exploring their definitions and uses, and even looking at some illustrative examples to put them into perspective.
Hopefully, you’ve gained a clearer understanding of these practices and how they can be applied to improve your organization’s testing efforts.
Your next step?
Consider how you might integrate these techniques into your black box testing process to enhance your approach and, ultimately, improve software quality.
From internal bug reporting to production and customer support, our all-in-one SDK gets you all the right clues to fix issues in your mobile app and website.
We love to think it makes CTOs life easier, QA tester’s reports better and dev’s coding faster. If you agree that user feedback is key – Shake is your door lock.
Read more about us here.

Add to app in minutes

Doesn’t affect app speed

GDPR & CCPA compliant

Unexpected things pop up
Just like bugs in your app or web 🐛 Fix them now with just one reporting tool.