
AI bug triage: the complete guide

The defect management process is crucial to the health of your software because the more bugs and errors are prevented, caught, and resolved during development, the better the end product will be once it hits the market.
In this article, we’ll cover the main stages of the defect management process and explain how each one contributes to cleaner, less bug-ridden software.
We’re starting at stage zero: preventing as many defects as possible from cropping up in the code.
Table of Contents
Once a defect has been discovered in the testing process, a cost is already incurred because the development team will need to clock in extra time in order to eliminate it.
And with the cost of fixing bugs amounting to thousands of dollars, prevention is definitely worth the effort.
For example, have a look at what it costs to fix a single bug using defect management data from Google:
| Measurement | Value |
| Average time needed to fix a bug | 15 hours |
| Average hourly rate for an engineer in 2021 | $68.83 |
| Total cost of fixing a bug | = $1032 |
At the prevention stage, defect management is mostly concerned with proper planning and risk assessment.
You’ll want to look at the resources available to the development team at the start of the project and consider if they’re going to lead to the appearance of bugs and errors.
For instance, you can evaluate the size and dynamics of your team.

Get unreal data to fix real issues in your app & web.
Obviously, the bigger and more displaced your team is, the more likely it is for the defects to appear because of miscommunication and diverging coding practices.
You can also prevent a lot of bugs if you put in the effort to create comprehensive requirements and specification documentation that’s approved on all levels (from client and management down to development).
As they say, prevention is the best medicine, so make sure defect prevention is an integral part of development planning for truly effective defect management.
The defect discovery stage starts as soon as unit testing is underway. During this phase, it’s important to remain realistic. It’s practically impossible to ship a bug-free product.
Rather, the goal of this phase is to discover as many defects as possible while they’re still relatively inexpensive to fix.

The defect discovery stage of the management process has three sub-phases.
First, defects are found using standard testing methods.
That’s the basis of this stage, but defects aren’t fixed upon discovery or even confirmed as defects yet, hence the other two sub-phases.
After discovery, defects need to be logged and reported.
An automated bug reporting tool, such as Shake, might help you with this.
Shake can create a comprehensive report with over seventy pieces of information so that testers can quickly understand the source of the issue and how to fix it.
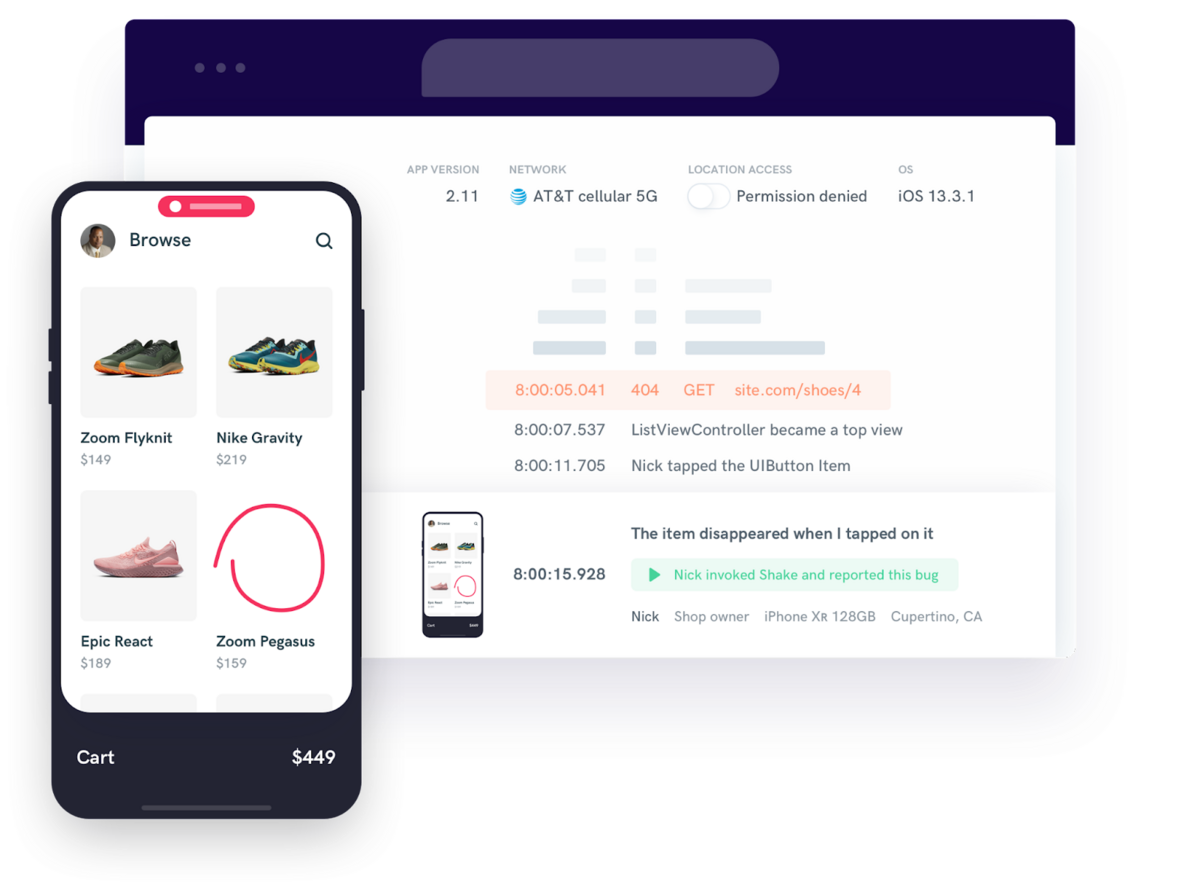
With a detailed report, developers can then accept the defect and mark it so that it can be fixed down the line, or reject it as a misreported defect.
So, to sum up, this stage will produce the bulk of the work you’ll need to do when fixing bugs.
The defects found, reported, and accepted here will be dealt with in the following stages of the defect management process.
The defects found during testing won’t have the same severity and level of harmfulness to your software.
That’s why the next stage of the process deals with categorizing bugs so that you can plan the work on eliminating them.
In a standard defect management process, the severity of the defects can be categorized as follows:
So, for example, if the product doesn’t allow the user to successfully sign in with the right credentials, that can be considered a critical defect because the user is locked out of the software completely and therefore won’t be able to use it at all.
This kind of defect should be prioritized because it renders the entire product practically inoperable.
Furthermore, if the software’s main features work but take a very long time to load or return inaccurate results, that can also be considered a high-priority bug, because it puts the entire user experience at risk.
This kind of defect should also be prioritized in the debugging process, but since it allows the system to actually work, it’s not as high-priority as a critical defect.
In the defect categorizing stage, you’re still not resolving any problems.
Nevertheless, this phase is important because it will help you come up with a plan of action once it’s time to tackle the defects.
Once any defects in the code are found, the development team is tasked with their resolution.
For an optimal workflow, product managers or development team leads should take ownership of this stage of the defect management process and organize how bugs should be handled.
So, the first step here is to assign a developer or technician to the defect.
This is where bug-reporting tools such as Shake come in handy again, as they have features that let you tag, assign and communicate with people on your team within the app.

Once the developers have their assigned bugs, they can categorize them in the way that we discussed in the last section.
Prioritizing the bugs according to severity will help them come up with a schedule for the resolution process.
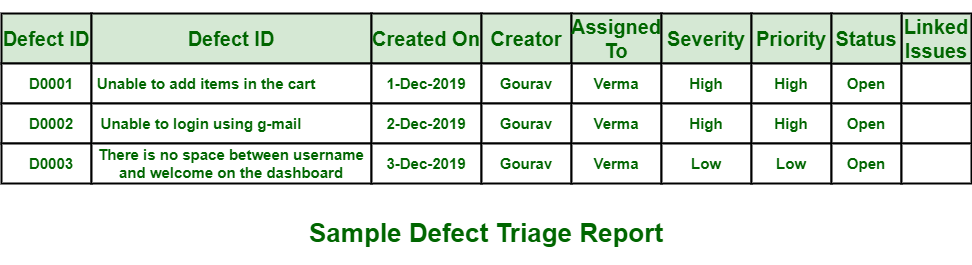
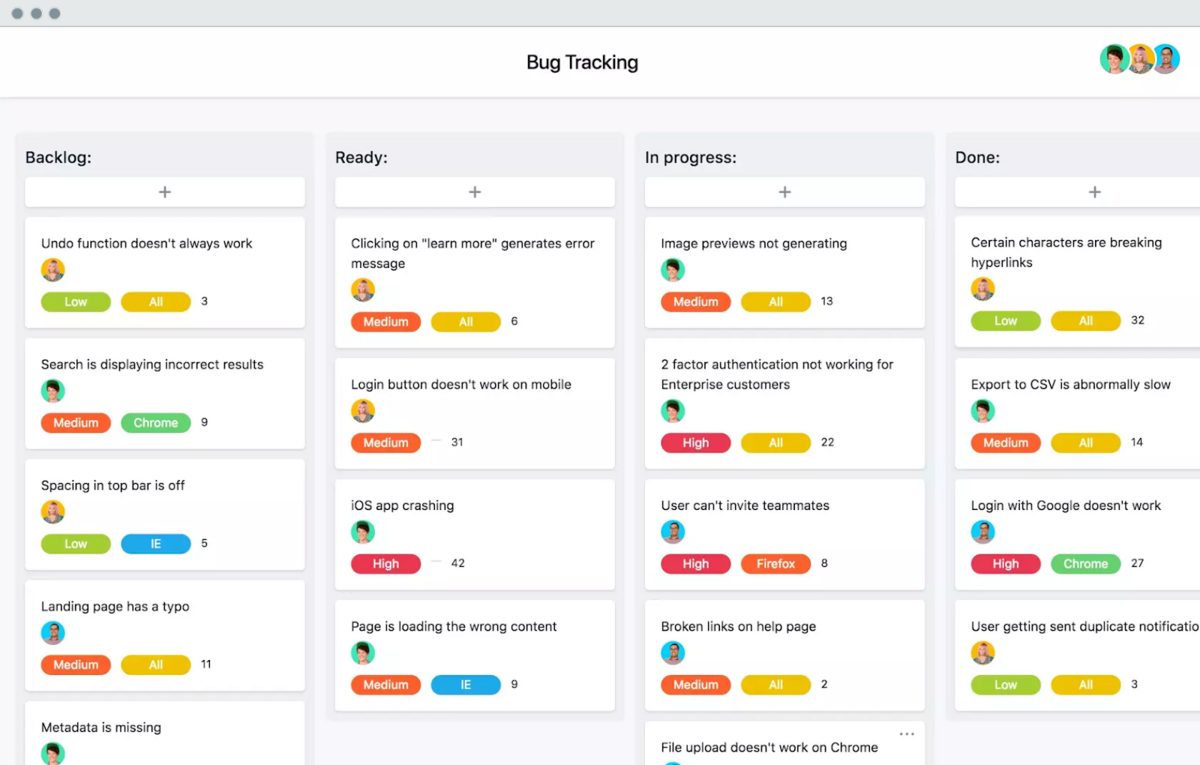
This schedule is often called defect triage and can look something like this:
The development team can then approach resolving the defects they were assigned to.
As the process goes forward, they can modify the schedule by marking the status of resolved defects as closed or complete to give the product manager or team lead a good overview of how debugging is progressing so they can plan the next stages of the process.
This stage is when the bulk of the defect management process happens and when it’s finished, you should be left with a much cleaner code than when you started.
Once a defect is resolved, the development team communicates the successful resolution to the testers so that they can be aware that the bug is no longer an issue.
However, before the defect can truly be crossed off the list, the testers need to verify that the defect has indeed been resolved and doesn’t pose a threat to the software anymore.
This is done by taking the same actions that produced the bug in the first place.
So, for example, if the defect affected the login process, the tester would once again try to log into the software using the same method (e.g., the same browser). If the action can now be completed successfully, the defect is verified as fixed.
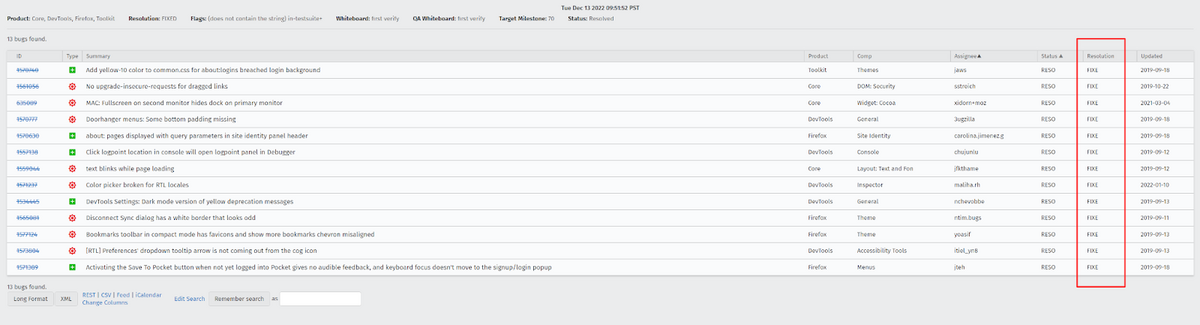
In that case, the tester will report the successful resolution. Here’s how that report looks for Mozilla’s testers:

They could also change the status of the defect in the log so that product managers or whoever oversees the defect management process can track how bug resolution is progressing.
This concludes the defect management process as the defect was tracked from discovery to verified resolution.
But it doesn’t conclude our article because we have one more stage that happens in parallel with all the other actions in this process: continuous improvement.
Like any other process, defect management can be improved by finding bottlenecks in the workflow and focusing on eliminating them.
Which parts of the process can be improved is going to depend on your team and your unique defect management process.
For example, if the development process at the company is producing an inordinate amount of defects, more focus could be awarded to defect prevention, reducing the number of bugs that need to be managed.
This could be done, for instance, by standardizing coding at the company so that everyone on the development team is on the same page and uses the best practices when writing code.
Similarly, if the development team shows varying success in tackling their assigned defects, that could mean that management isn’t as effective as it could be in dealing out assignments.
Perhaps they don’t fully understand the severity of individual defects to properly categorize them, or they aren’t completely aware of the skill levels of individual development team members.
In both cases, it might be a good idea to work on better communication between product managers and developers so that defect categorization can be improved.
Whatever the case, it’s up to everyone who participates in the defect management process to discover which stages of the process aren’t progressing smoothly and find ways to improve them so that the entire process can run more seamlessly.
The key takeaway from this article is that defect management is a highly collaborative process. It requires developers, testers, and managers to work together so that as many defects as possible are discovered, categorized, resolved, and verified as fixed.
Therefore, our advice is to keep investing in good communication, positive relations, and smart development practices to keep bugs at bay and deliver software on time.
Do your best to adopt defect management as a core process as you’re developing your products and implement it in every phase of the development life cycle.

From internal bug reporting to production and customer support, our all-in-one SDK gets you all the right clues to fix issues in your mobile app and website.
We love to think it makes CTOs life easier, QA tester’s reports better and dev’s coding faster. If you agree that user feedback is key – Shake is your door lock.
Read more about us here.

Add to app in minutes

Doesn’t affect app speed

GDPR & CCPA compliant

Unexpected things pop up
Just like bugs in your app or web 🐛 Fix them now with just one reporting tool.