
Recommended
Common challenges in testing mobile apps
Manual app testing is a tried-and-true method that relies on good old-fashioned human expertise and intervention.
Unlike its automated counterpart, it’s ideal for evaluating the app’s usability and performance and discovering bugs and errors that often elude machines.
However, as with everything in app development, there’s no single way to go about it.
There are many types of manual testing, as well as the techniques, and methods of conducting it, and they each have their own set of advantages and disadvantages, which is why it’s important to know their differences before starting your QA activities.
In this post, we’ll delve into the most prevalent manual testing activities and equip you with some nifty pointers to kickstart your testing efforts.
Let’s get started!
Table of Contents
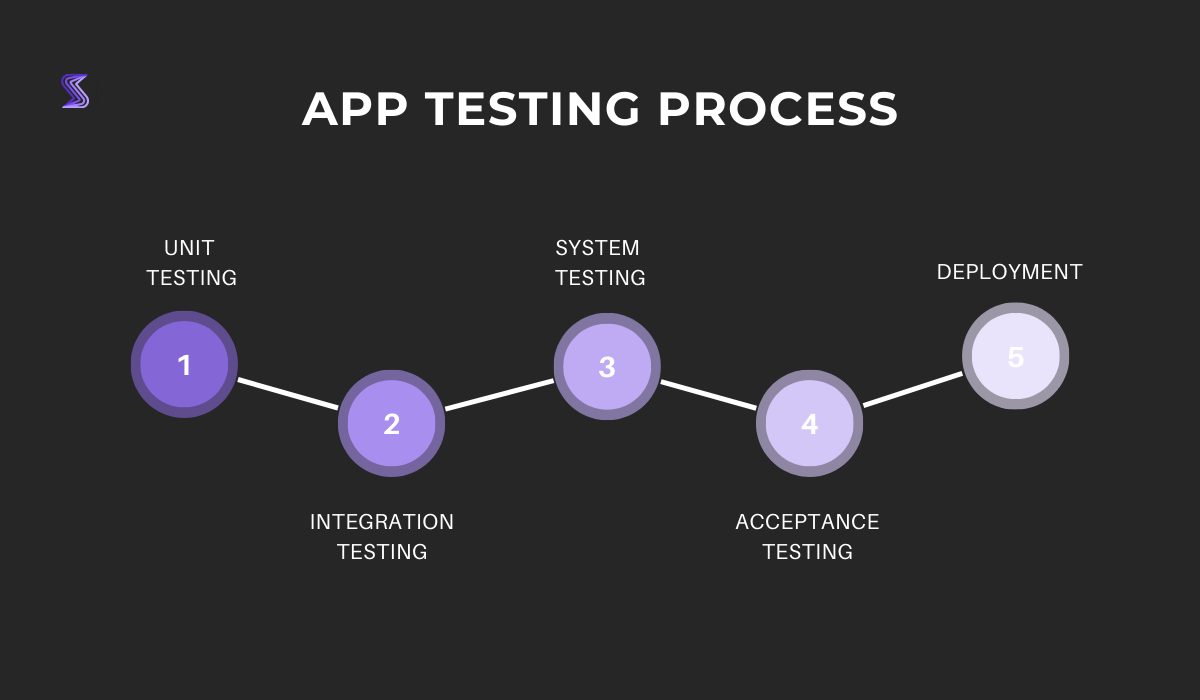
There are several types of manual app testing, and each one plays a crucial role in making sure the app is nothing short of exceptional.
From investigating the user interface to uncovering functional errors and bugs, and optimizing performance, these tests are pivotal for delivering a high-quality product.
Let’s take a look at some of the most common types and examine what they entail and how they diverge.
The first type of testing we’ll cover is unit testing, the most basic form of all manual testing and, safe to say, its foundation.
It’s a process that zooms into the tiniest units of code, inspecting every nook and cranny to uncover hidden bugs and elusive glitches.

Get unreal data to fix real issues in your app & web.
Typically, developers conduct this type of testing as they write their code.
The process goes like this. First, they write one unit of code and then subject it to a testing process to ensure that it performs correctly.
If not, they make the necessary changes and retest it again. Only after that do they integrate it with other code units.
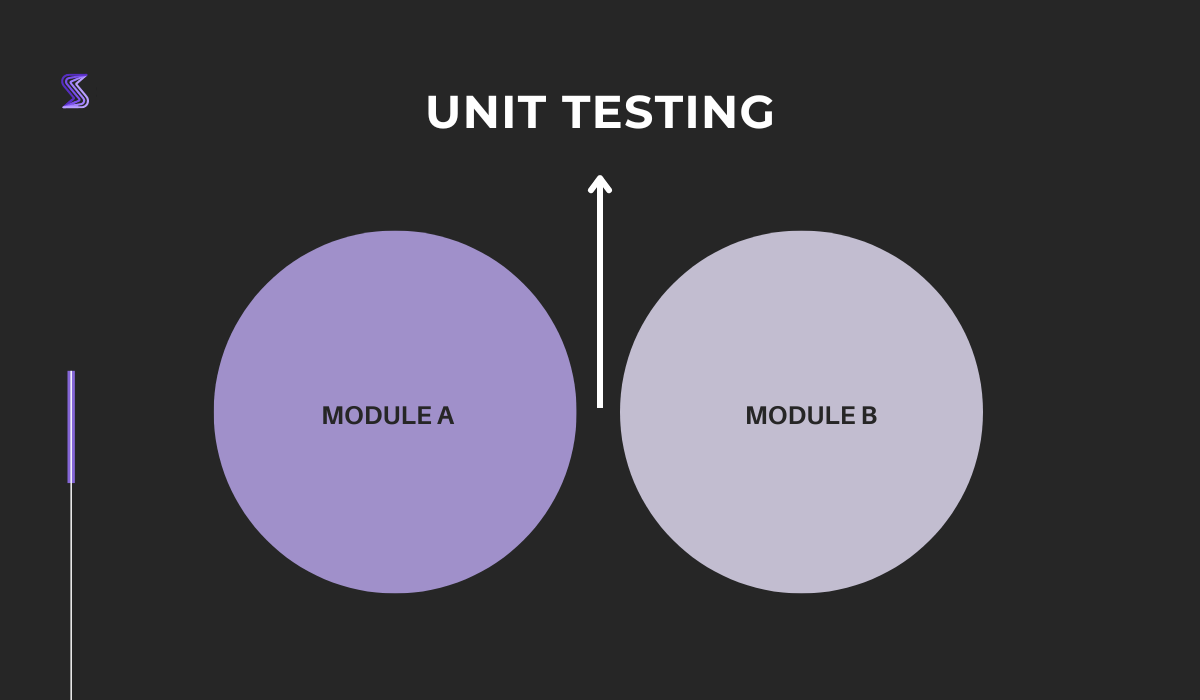
Unit testing provides many benefits. It’s quick, efficient, and can be performed frequently to guarantee the reliability, functionality, and quality of the code.
By conducting thorough unit testing, developers can identify and fix bugs early, ensuring that no major defect slips through the cracks and impedes the flow of the project.
After the unit testing is complete, integration testing takes place because now multiple code units are being assembled together to be tested as a whole.
The aim is to verify that all its components work together correctly.
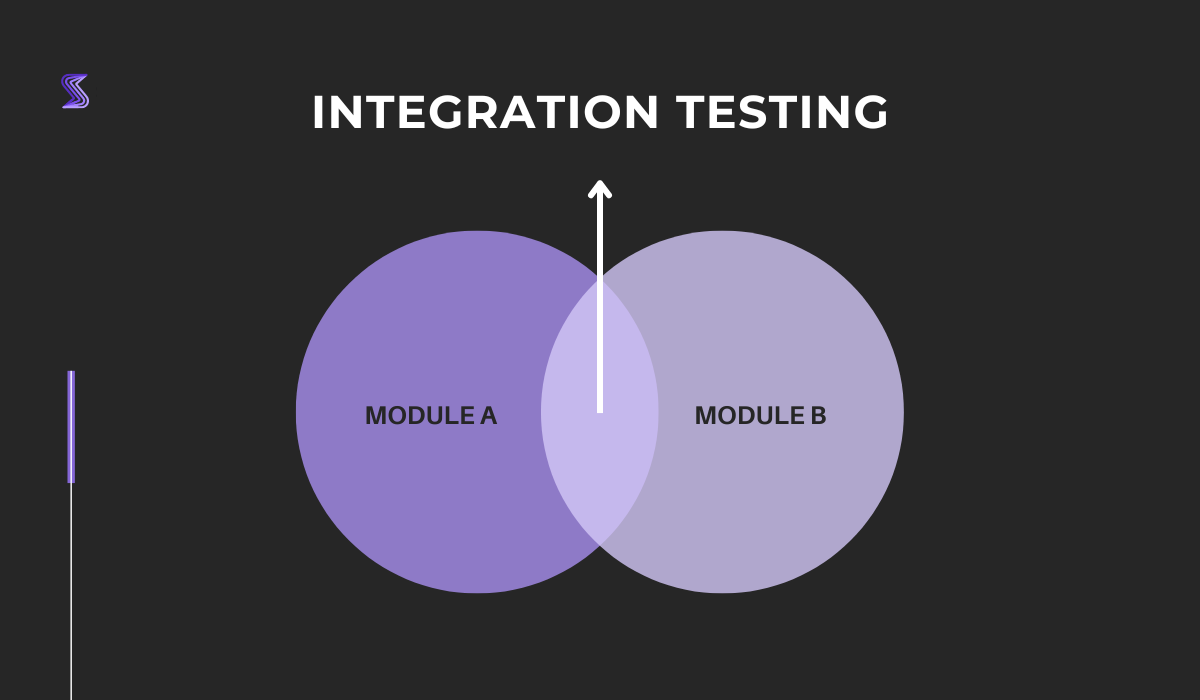
You may wonder why this testing is necessary if we’ve already tested each code unit separately.
When you have many developers working on different parts of the code, each of them has their own understanding of the coding process and logic.
That is why there is still a risk that they could clash when they’re put together.
Additionally, in app development, clients often make last-minute changes to the requirements of a project.
These new changes may not be unit-tested so the integration testing will reveal any possible flaws in the app.
Integration testing, therefore, acts as a safety net for those potential conflicts and ensures that all moving pieces work together seamlessly.
After integration testing, it’s time for the moment of truth, which is system testing.
This is where you get to see how your app’s system performs as a whole.
Here, you’re not just testing individual code units or their interplay, as you did with previous types of testing, but rather verifying the overall functionality and performance of a completely integrated system.
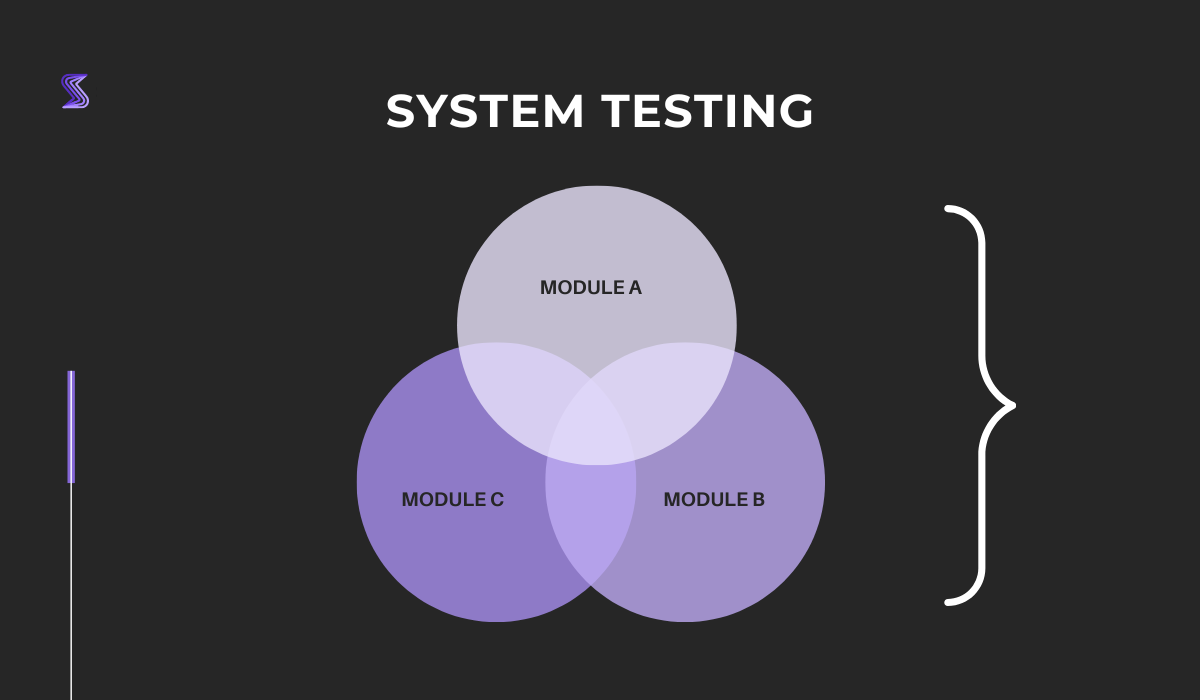
That is why this type of testing typically falls under the domain of QA specialists who evaluate the interface, security, instability, usability, loading, and other attributes of the app that don’t require delving into the code.
As is often the case, there is a drawback to manual system testing.
It can be a time-consuming and costly undertaking, given that it entails inspecting the entire app’s system.
However, the effort is usually rewarded with a more stable and polished app.
No matter how much time you’ve spent testing your app internally, it’s impossible to know for certain that it will work as intended until it reaches the hands of real users.
That is why acceptance testing is an unmissable step that comes after system testing and before you launch your app.
By inviting a select group of end users and clients to test your app, you can acquire invaluable, real-world feedback that you simply can’t get from internal testing alone.
This feedback will be your ticket to discovering whether your app is intuitive and functional enough to meet the expectations of your users and the business requirements of your clients.
Keep in mind that the feedback you receive from acceptance testing is invaluable.
You can use it to fine-tune your app and eliminate any imperfections before the final release.
There is a variety of manual testing techniques you can use to ensure that your app is up to snuff.
While it’s not possible to use every technique on every project, having a comprehensive understanding of the options at your disposal will equip you with the right approach to any situation.
Some of these techniques are more complex than others, but they all share one objective―to root out pesky bugs and glitches before the app goes live.
Without further ado, here are the most commonly used manual app testing techniques.
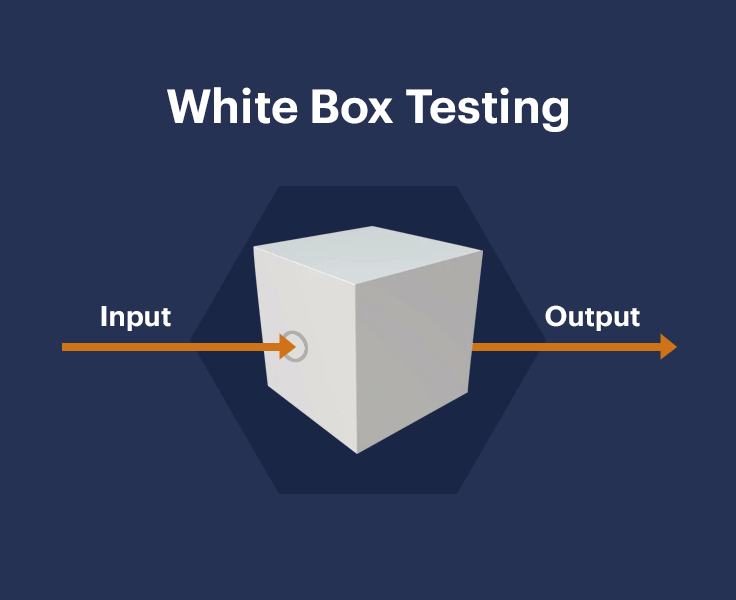
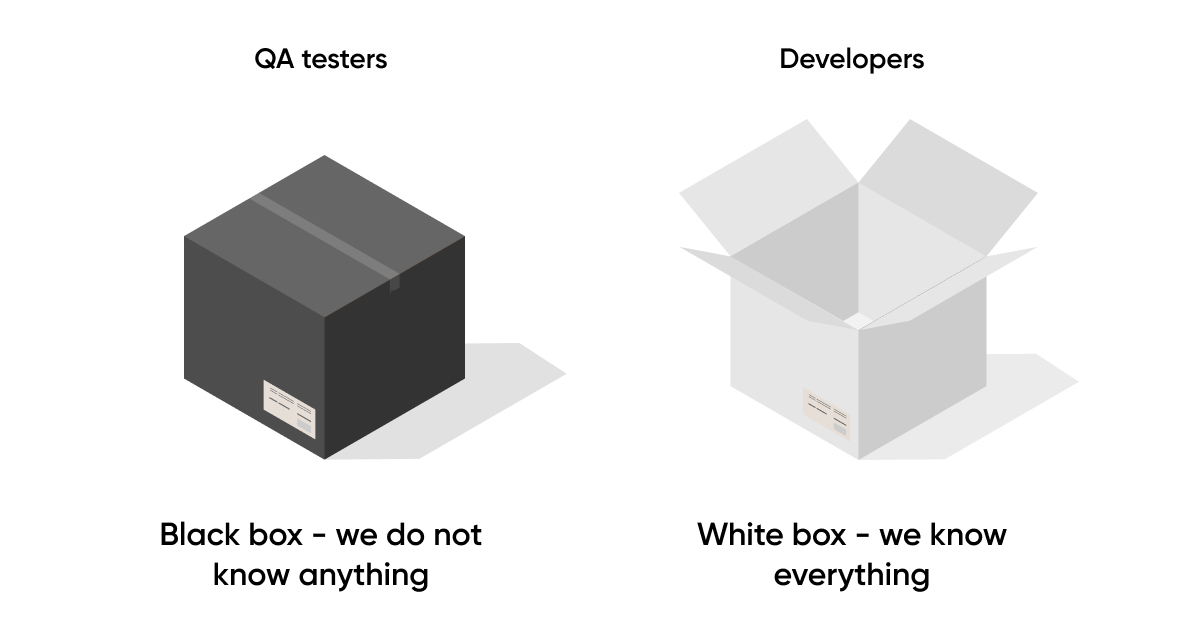
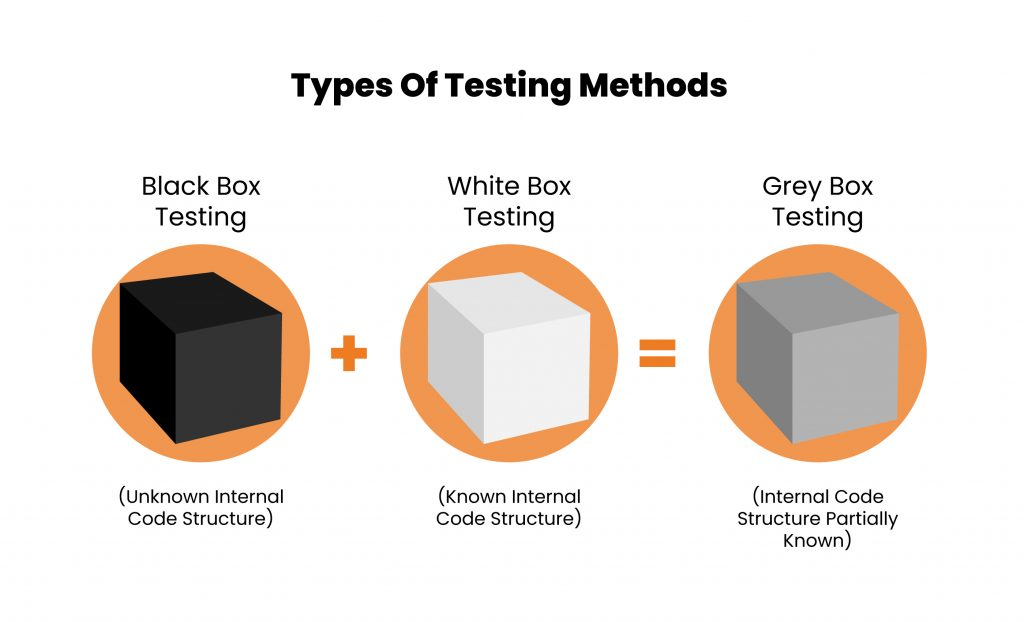
White-box testing is a powerful technique that allows developers or QA specialists, depending on who performs the testing, to dive deep into the intricate inner workings of an application.
By peering inside the box, they gain a unique viewpoint that lets them explore the source code in detail.
That is why this technique it’s also known as glass box testing, open box testing, and transparent box testing.
However, it’s worth noting that white box testing requires a special set of skills and expertise, as QA specialists must have a thorough understanding of the code they’re examining.
This kind of expertise is mandatory because teams are required to identify security vulnerabilities, inspect broken or inefficiently structured paths, check that each possible input returns the expected result, and so on.
And without having this knowledge, it can be challenging to perform white-box testing well.
All in all, white-box testing is considered to be one of the most effective testing techniques for finding bugs, but it also takes more time than other test techniques.
However, the payoff is a higher degree of confidence that the app functions as intended—and that is worth the effort.
Black-box testing is a powerful technique that enables teams to assess an app’s external behavior without looking inside its code.
That means that this method will put QA specialists in the shoes of end-users, where they’ll use the app and test its usability, responsiveness, and reliability.
And the best part? They can do all this without ever peeping under the hood.
By focusing on the app’s external behavior, black-box testing helps QA specialists identify errors and defects that may go unnoticed with other testing methods.
And that’s crucial because end users don’t care about what’s going on behind the scenes. What they care about is how well the app works.
That’s why manual black-box testing should be an indispensable part of your testing strategy if you want to deliver a top-quality product.
Grey-box testing is a unique technique that blends the best of both worlds―black-box testing and white-box testing.
In this approach, the QA specialists have some insight into the internal workings of the app, but not complete access to its code or architecture.
This approach, therefore, allows them to evaluate software functionality, security, and usability from an end-user standpoint while considering the internal structure and behavior of the system.
Needless to say, a technique like this can offer a wide array of useful benefits.
For example, by employing grey-box testing, QA specialists can develop test cases that encompass a wider variety of scenarios, including interactions between components and logical errors.
Also, by having access to the code or design specifications, they can identify bugs that may not be apparent through black-box testing alone.
This means that grey-box testing can help identify hidden defects that could cause problems later on in the software development life cycle, which makes it an essential technique for software quality enhancement.
Now we’re ready to dive into the nitty-gritty of manual testing―how you actually perform it.
So if you’re ready to take your manual testing game to the next level, read on for a few actionable tips.
When it comes to performing manual testing, the first step should always be to analyze the app’s requirements.
This involves going deep into the app’s purpose, target audience, business demands, and software requirements, as shown in the picture below.
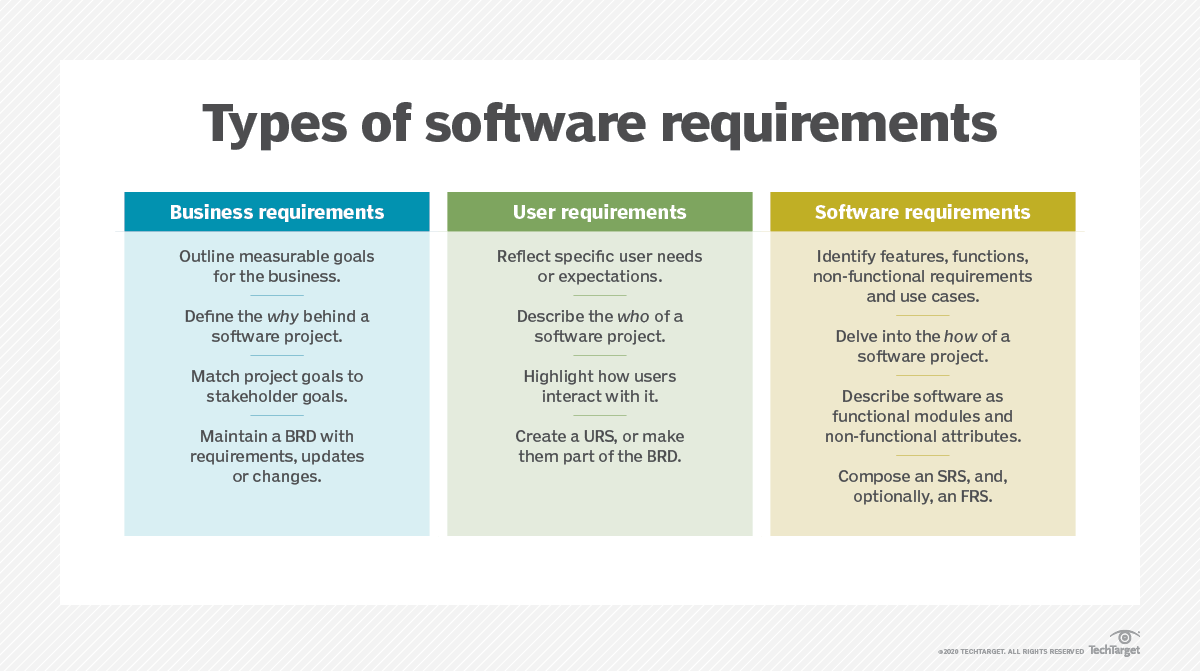
To analyze requirements effectively, QA specialists should, therefore, gather information from a variety of sources.
This includes poring over the documentation, talking with the development team and project managers, and researching the app’s intended use cases.
This information will help identify which areas of the app to test and which test cases are necessary to cover different scenarios.
Remember, if you nail the requirements analysis, you’re off to a great start. But if you get it wrong, any testing that follows will essentially be shooting in the dark.
Once you have analyzed the app’s requirements, your next move should be to craft test cases that will guide your QA specialists every step of the way.
Each test case should cover a specific scenario and clearly state the expected outcome. Simplicity is key here―write it in a way that everyone can comprehend.
Plus, organize it logically to make execution seamless, just like in the example below.
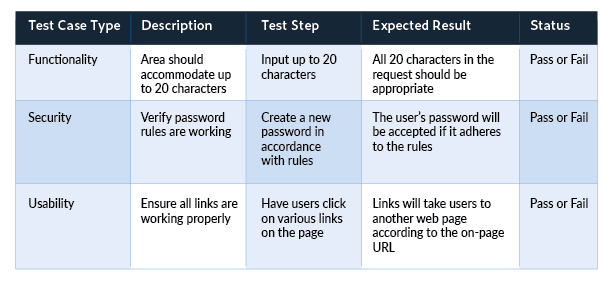
While simplicity is important, that doesn’t mean you shouldn’t be thorough in writing test cases.
Make sure you cover all the relevant scenarios, including both positive and negative ones.
Positive scenarios are great, but negative ones are just as important as they cover all the possible errors and exceptions that could occur.
And lastly, keep in mind that test cases are not set in stone, and it’s a good idea to be open to revising and updating them as you discover new issues or as the app evolves.
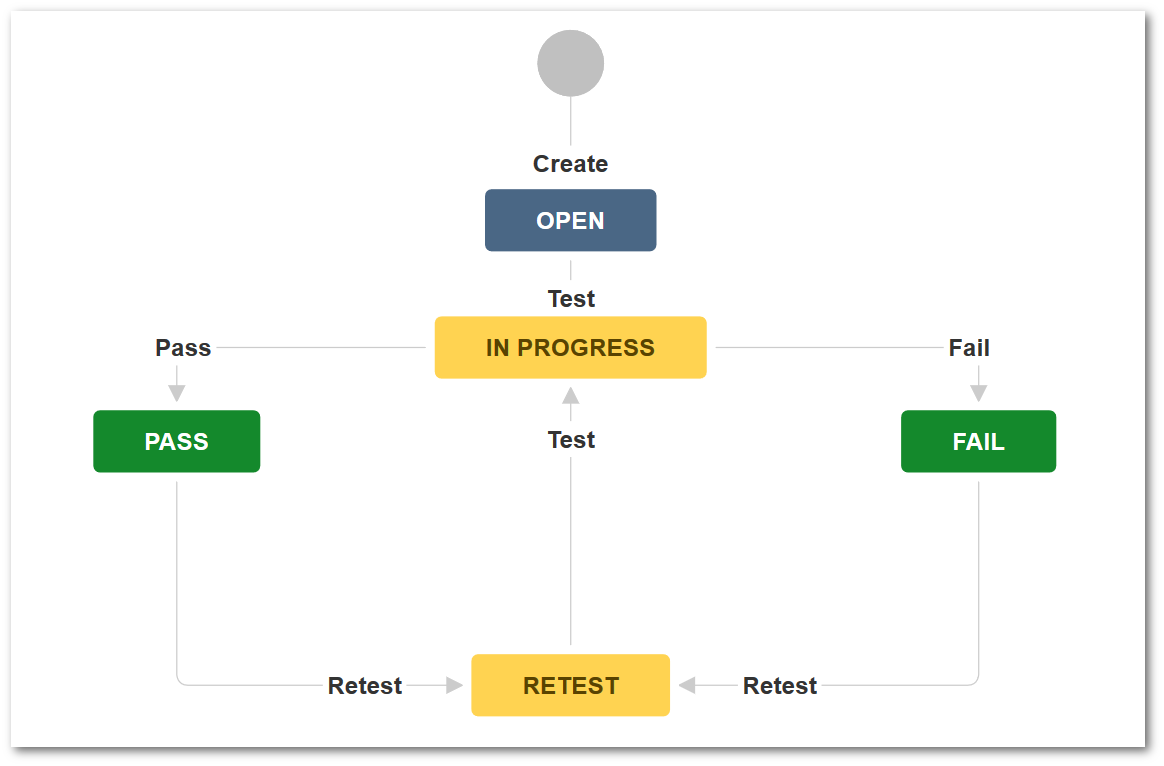
Executing prepared test cases is a crucial step in ensuring that the app performs as expected.
That is why QA specialists should meticulously follow the steps outlined in each test case and document every result, flagging any deviations and presenting them to the development team.
But meticulousness alone is not enough. Test cases must also be executed systematically, following a strict order to ensure no bug is missed.
As you can see in the example below, each test case should follow a certain path, with stages such as Open, In progress, Pass, Fail, and Retest.
But here’s the catch: testing an app on just one device or operating system won’t cut it.
To ensure the app works flawlessly across all platforms, it should be tested on multiple devices and operating systems.
Of course, it’s impossible to own every model from every manufacturer with all operating systems.
So, make sure to execute test cases thoroughly on the devices you have at your disposal, and reach for automation tools to cover the rest.
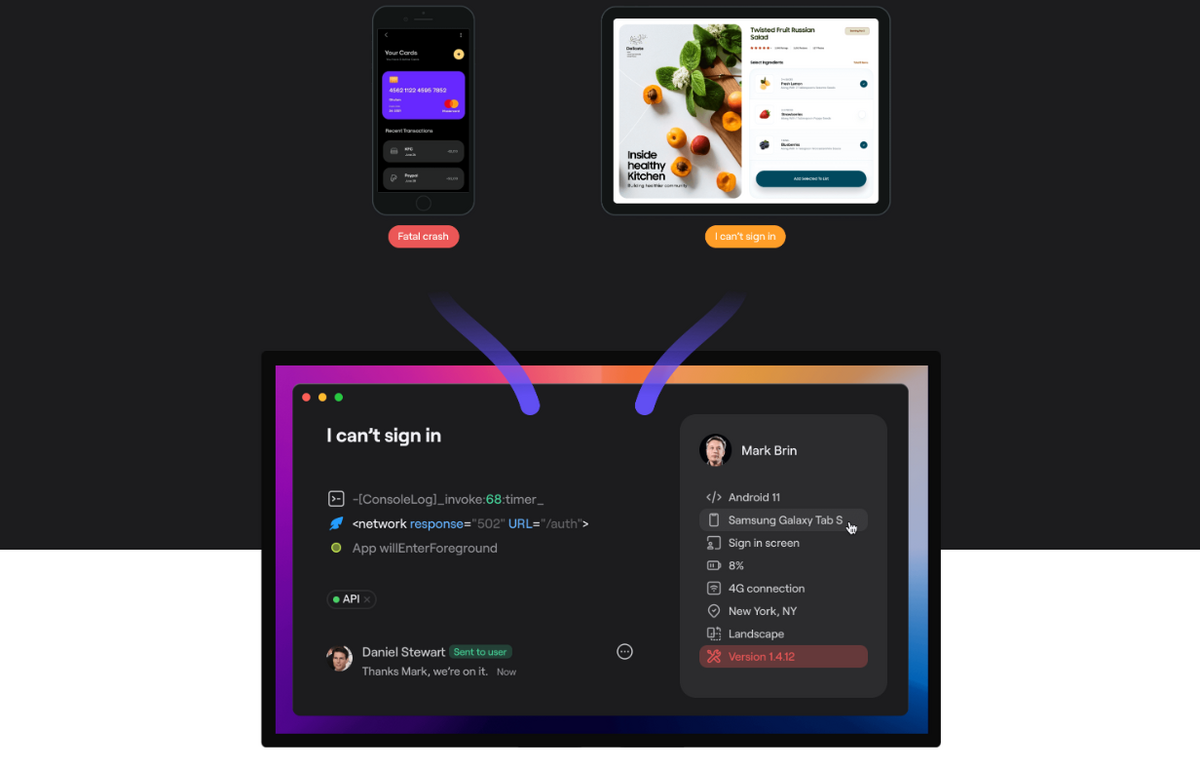
And finally, it’s time for QA specialists to report found bugs in the app to developers.
Reporting involves documenting defects or other issues and notifying the development team of them.
The reports should include as much pertinent information about the bugs as possible, such as steps to reproduce, environmental data, expected and actual outcomes, and more.
Here is an example of a well-written bug report:
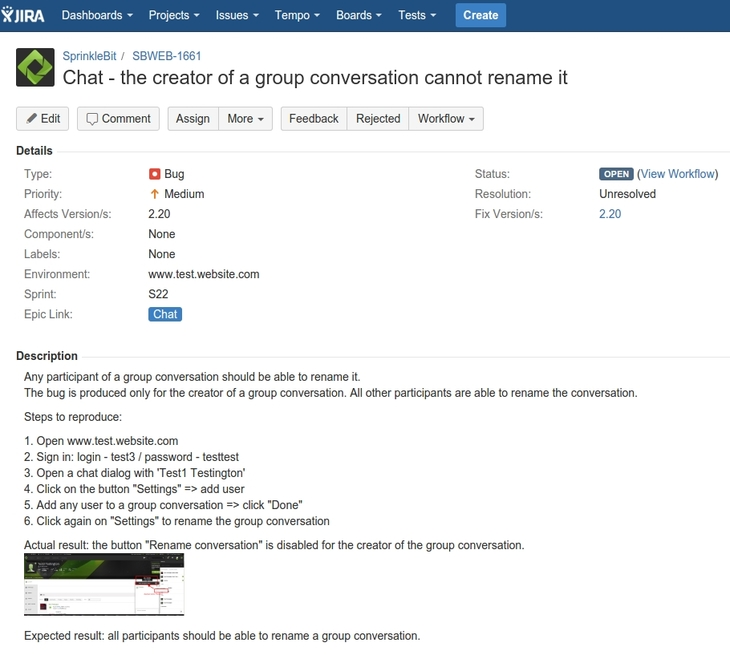
By providing this information, QA specialists help ensure that the development team can quickly fix the issues before releasing the app to the public.
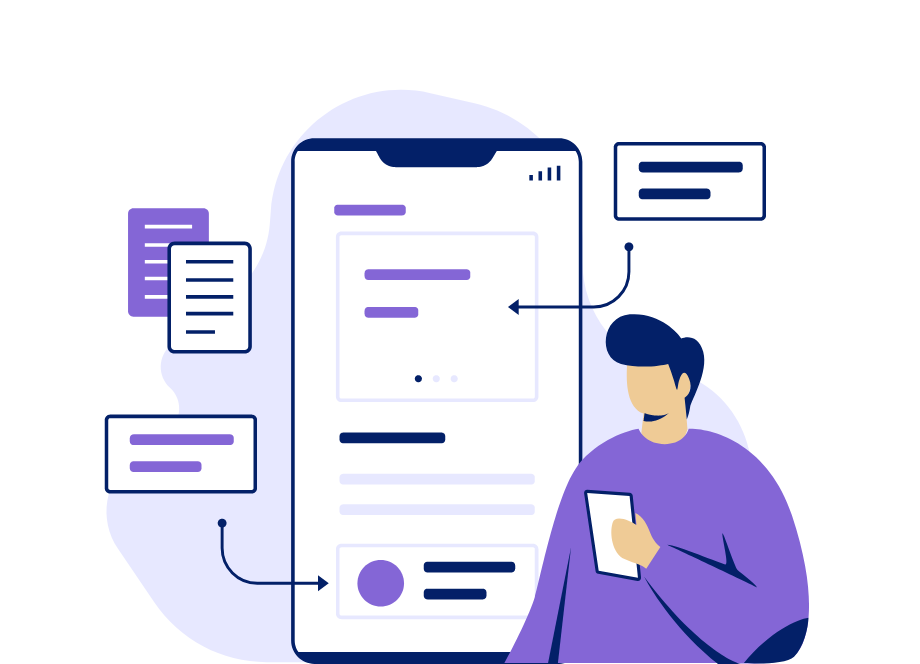
But why limit yourself only to manual testing when you can maximize your reporting efforts with bug and crash-reporting tools?
Take our tool Shake as an example.
It’s a lightweight SDK that you simply install on your iOS or Android mobile phone and then use during testing.
When you spot a bug in the app, all you have to do is shake the phone, and the tool will automatically create a detailed report concerning the bug.
Shake integrates very well with issue-tracking and management tools such as Jira, Trello and Asana, meaning that the report will automatically pop up in their dashboard, where the developers can assess it.
This makes the bug-reporting process a whole lot easier.
While sometimes it may seem like a lot of work, manual testing can help you identify performance issues, bugs, and errors that automated tests might miss.
As such, it’s important to know the differences between various types, techniques and methods so that you can choose the one that is perfect for your needs.
Hopefully, this article has shed some light on the subject and given you some pointers for your own app development projects.
From internal bug reporting to production and customer support, our all-in-one SDK gets you all the right clues to fix issues in your mobile app and website.
We love to think it makes CTOs life easier, QA tester’s reports better and dev’s coding faster. If you agree that user feedback is key – Shake is your door lock.
Read more about us here.

Add to app in minutes

Doesn’t affect app speed

GDPR & CCPA compliant

Unexpected things pop up
Just like bugs in your app or web 🐛 Fix them now with just one reporting tool.