
Steps to automate bug triaging with AI

When building a mobile app, your job doesn’t end with development. As your developers deliver the code, you must ensure that the app actually performs the way you want it to.
Imagine releasing your app, and realizing that it won’t operate on Android, or that it crashes once the user receives a call or text. That kind of app isn’t likely to get much traction.
To avoid such scenarios, you’d do well to invest in mobile app testing, as it will ensure your app functions as envisioned.
That’s what this article is for—to show you the best practices in mobile app testing.
Table of Contents
When testing your mobile app, you want to be effective.
You don’t want different developers working on the same test case, team members overlooking a feature, or testers being unclear on the testing scope.
Planning the mobile app testing process is the easiest way to circumvent these roadblocks. With a plan, you’ll have much more control over the process.

Get unreal data to fix real issues in your app & web.
Roger S. Pressman summed up the benefits of a testing plan best:
Strategy for software testing provides a roadmap that describes the steps to be conducted as part of testing, when these steps are planned and then undertaken, and how much effort, time, and resources will be required.
With all these advantages a testing plan brings you, you’ll be able to test much more productively.
When planning your mobile testing, there are four chief documents to devise, shown below:
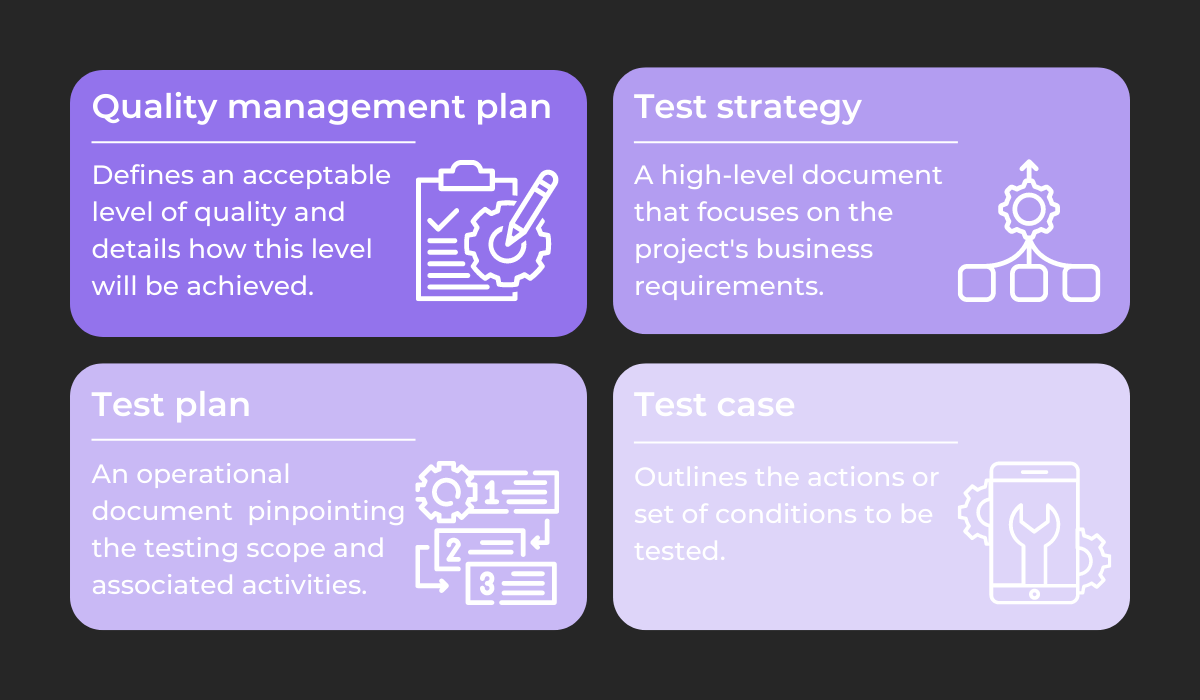
You can think of the quality management plan as a cheat sheet to ensure the app meets users’ expectations.
This document defines all quality roles, responsibilities, and standards to be achieved—it contains the software quality requirements.
As opposed to software requirements, the test strategy focuses on business requirements.
Because of this, it’s often the project manager’s responsibility, as they’ll utilize the document to outline testing approaches.
A test plan deals with the nitty-gritty testing specifications: the what, how, when, who, where, and why of testing. The testing scope and associated activities are also included.
Although there’s no official format for test plans, the IEEE standard 829 recommends this layout:
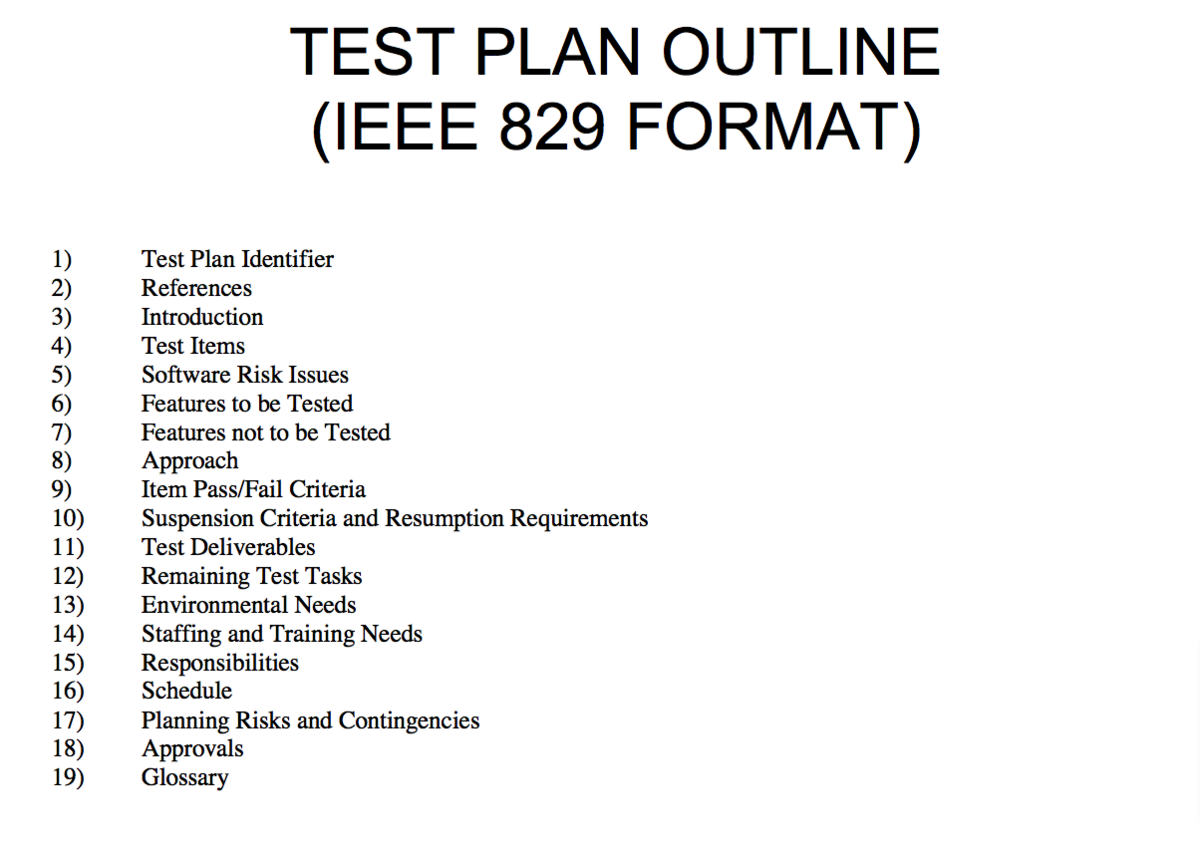
The test plan contains all the testing details you require, from the fail/pass criteria to the schedule.
Finally, the last document is the test case—it details the actions or conditions to be tested and describes the actual testing process.
It usually contains information such as test steps, data, the expected result, the actual result, the date of execution, etc.
Here’s an example test case:
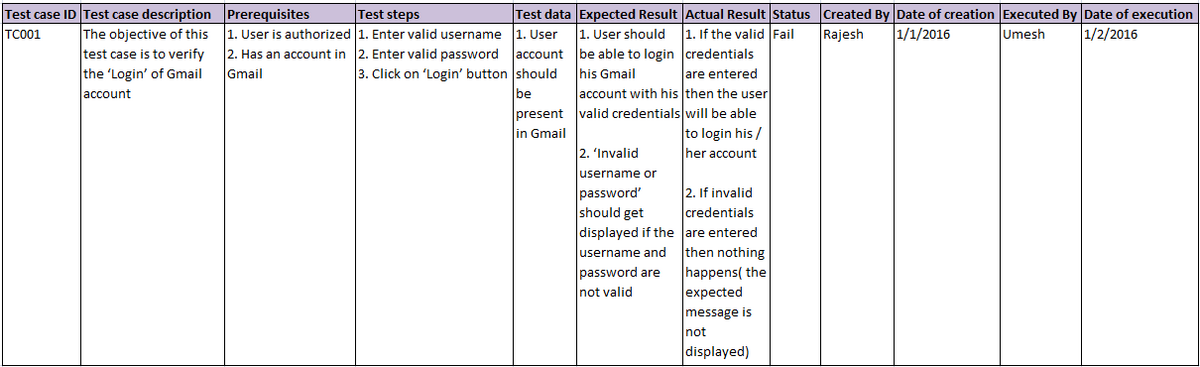
As you can see, test cases are highly detailed and provide all possible information about each testing occurrence.
If you’re having difficulties composing these documents, there are plenty of online resources to assist you.
For example, StrongQA offers several documentation templates for QA specialists.
With their templates, you won’t need to construct the text yourself—you can simply fill in the blanks in the pre-made template.
Here’s an example of a test strategy template:
As the document continues, explicit instructions on which information to record in which sections greatly facilitate the writing process.
With these resources and documents at your fingertips, you’ll have a thorough, beneficial app testing plan.
Although traditional methods often place testing towards the end of the software development lifecycle, this approach has proven to be arduous and counter-productive.
The visual below illustrates this well:
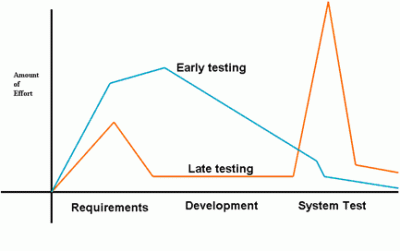
Look at the orange line illustrating late testing—although there’s less effort at the start, there’s a massive spike during the system testing stage.
Since QA isn’t involved during development, when the testers finally arrive, they must set up everything from scratch and likely completely re-do certain features.
This is sure to cause delays.
The early testing model, however, is much more productive. Although there’s a considerable effort at the beginning, it’s still less than the spike in late testing.
Furthermore, the QA team’s workload decreases as the project moves toward completion, creating a steady and stable development lifecycle. There are no sudden overhauls.
The benefits of early testing, otherwise known as shift-left testing, are so significant that it was voted the best method for optimizing testing:
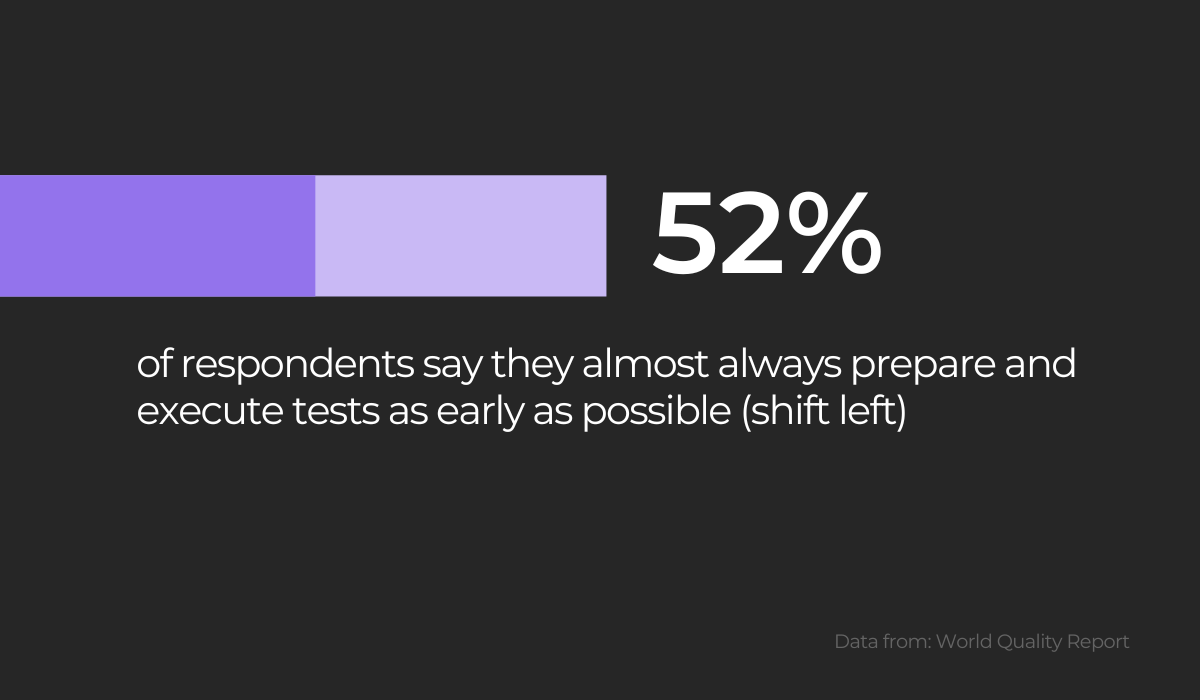
Shift-left testing was decided as the best approach for testing optimizing, even overtaking automated testing.
It’s easy to understand why. This approach often guarantees prevention rather than correction.
Since the testers are involved from the beginning, they can easily collaborate with the developers and run tests before even hitting the build.
Therefore, fewer bugs should creep into the codebase, accelerating the app’s delivery.
Michiel Mulders, a developer advocate, summed up the shift-left approach best:
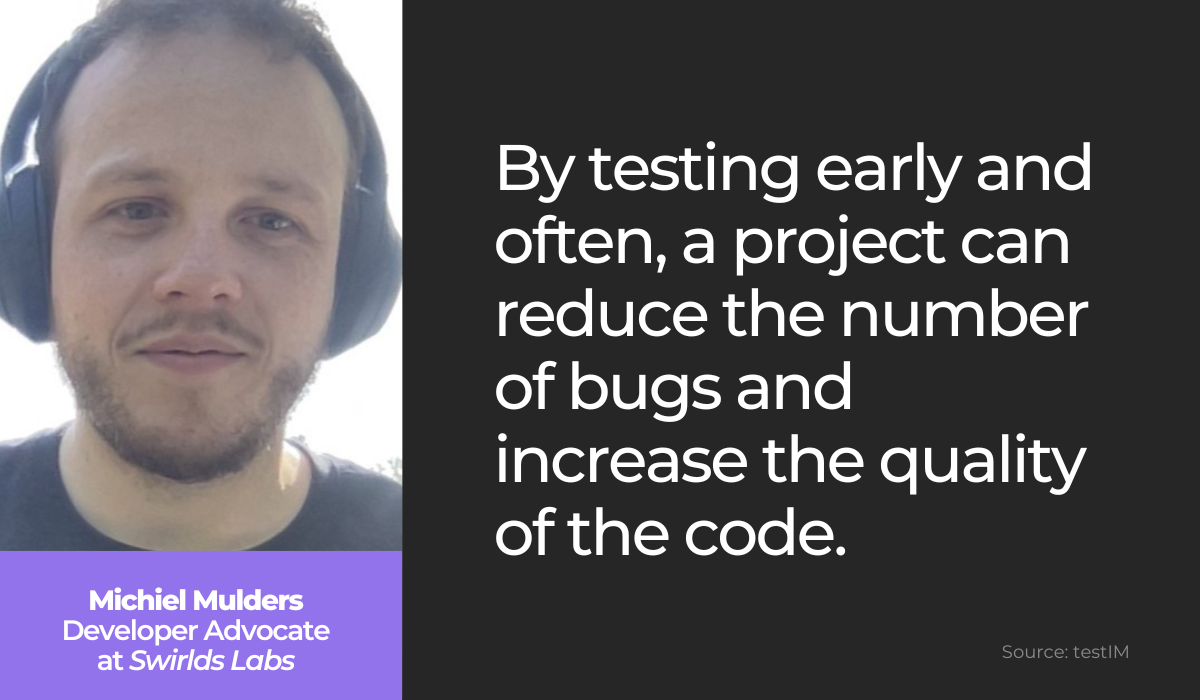
With shift-left testing, QA teams can capture bugs early on and increase the codebase’s quality. You could even wind up with zero bugs if they’re thorough enough.
The easiest method of shift-left testing is implementing test-driven development. As the name suggests, tests have priority over code—tests are written before the code is.
This approach maintains that the test has to fail first when there’s no code to activate it. However, then the developers write the code, striving to make it pass the tests.
Once that’s done, they refactor the code so that it can pass all tests.
These three steps are called the Red-Green-Refactor cycle:
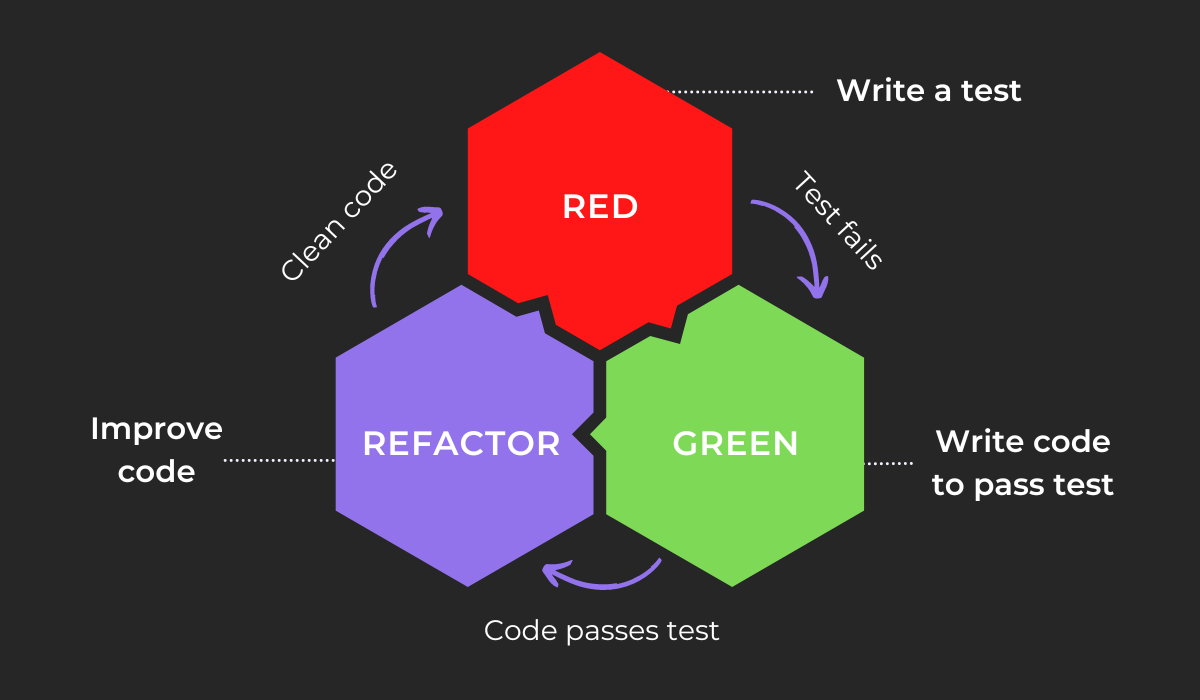
With this methodology, the tests immediately catch any bugs and are a constant source of feedback for the entire codebase.
As a final result, the end product is usually of exceptional quality.
Early mobile app testing will make the development process seamless, and you should have an easier time during deployment.
There are specific tasks only humans can do. You can’t expect a machine to devise a test strategy or discuss business requirements with stakeholders.
However, it can run tests for you.
Automating the mobile app testing process will save time so your QA team can focus on other essential tasks.
While the machine handles the testing, your testers can tackle the tasks that can only be performed by a human.
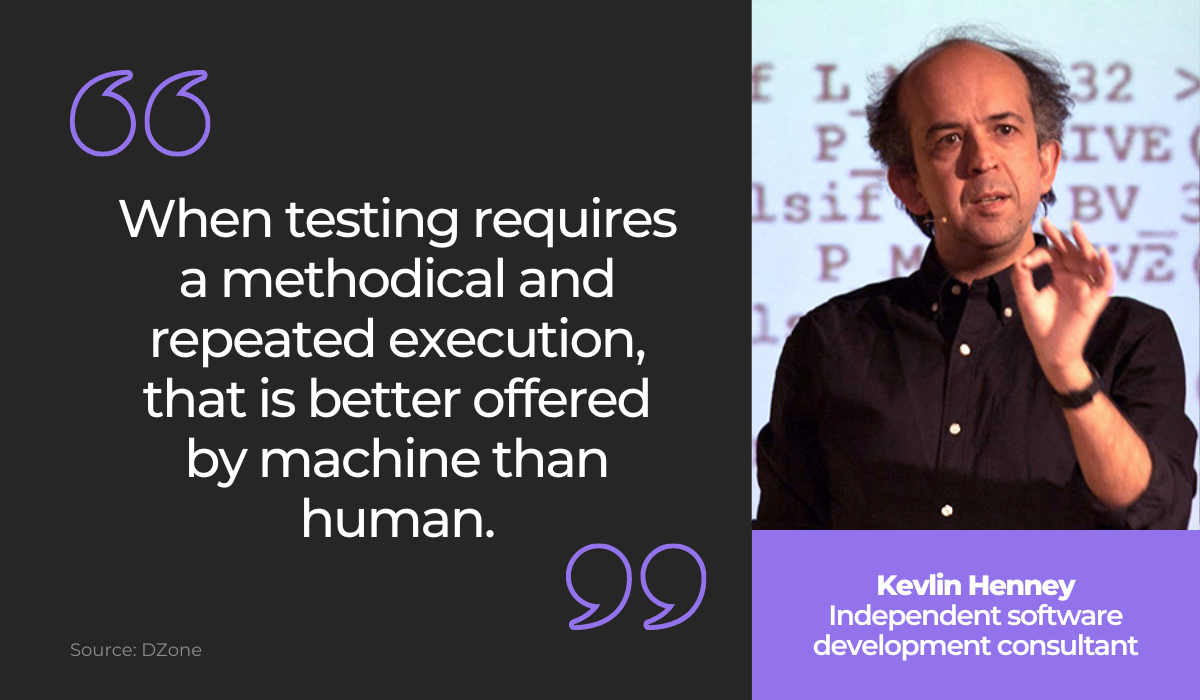
Kevlin Henney, a software development consultant, summarized the concept like this:
Furthermore, test automation eliminates the possibility of human error. Mistakes happen to the best of us, and a tester can lose focus here and there.
However, automated testing significantly reduces the chance of any errors.
If you’re unsure of how to start automation testing, try the following:
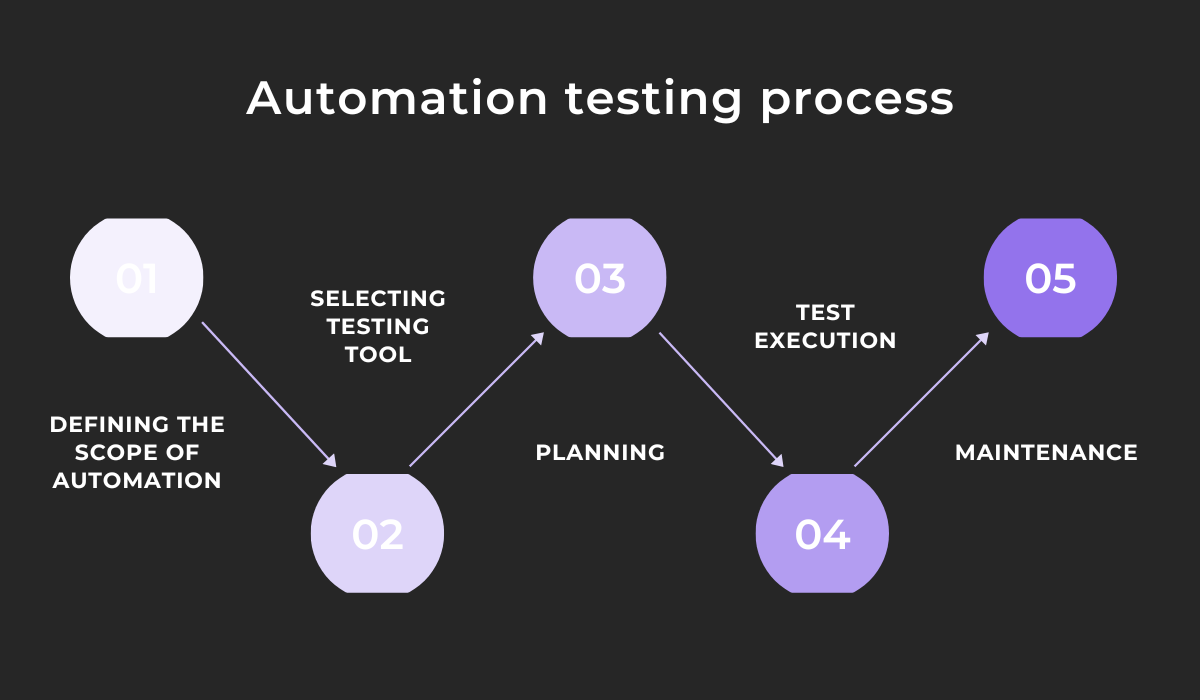
The first step is defining what exactly you want to automate. For example, automation testing is well-suited to regression and performance testing.
The former saves you multiple test scenario repeats, whereas the latter effortlessly simulates hundreds of server requests, user requests, and database queries.
Next is selecting the automation tool best suited for your needs. There are plenty to choose from, both for Android and iOS, so you’re sure to find a good fit.
Following that, there is the planning process, where you compose a list of all the use cases and briefly describe the intended result.
Finally, there comes the essential part—executing the test! The automation tools will take care of all the testing for you.
However, the process doesn’t end there. You’ll have to perform maintenance periodically, verifying that everything is still functioning as envisioned.
As you can see, this process does require some effort, but if done well, it will be well worth it.
To make sure you set yourself up for success, you should pay special attention to the second step: choosing an automation tool.
There are numerous options out there, and Appium is just one worth considering. A cross-platform tool, Appium is utilized for Android and iOS.
Its server receives test requests in JSON and then transforms them into commands to be accepted by native testing frameworks.
Here’s a visual representation:
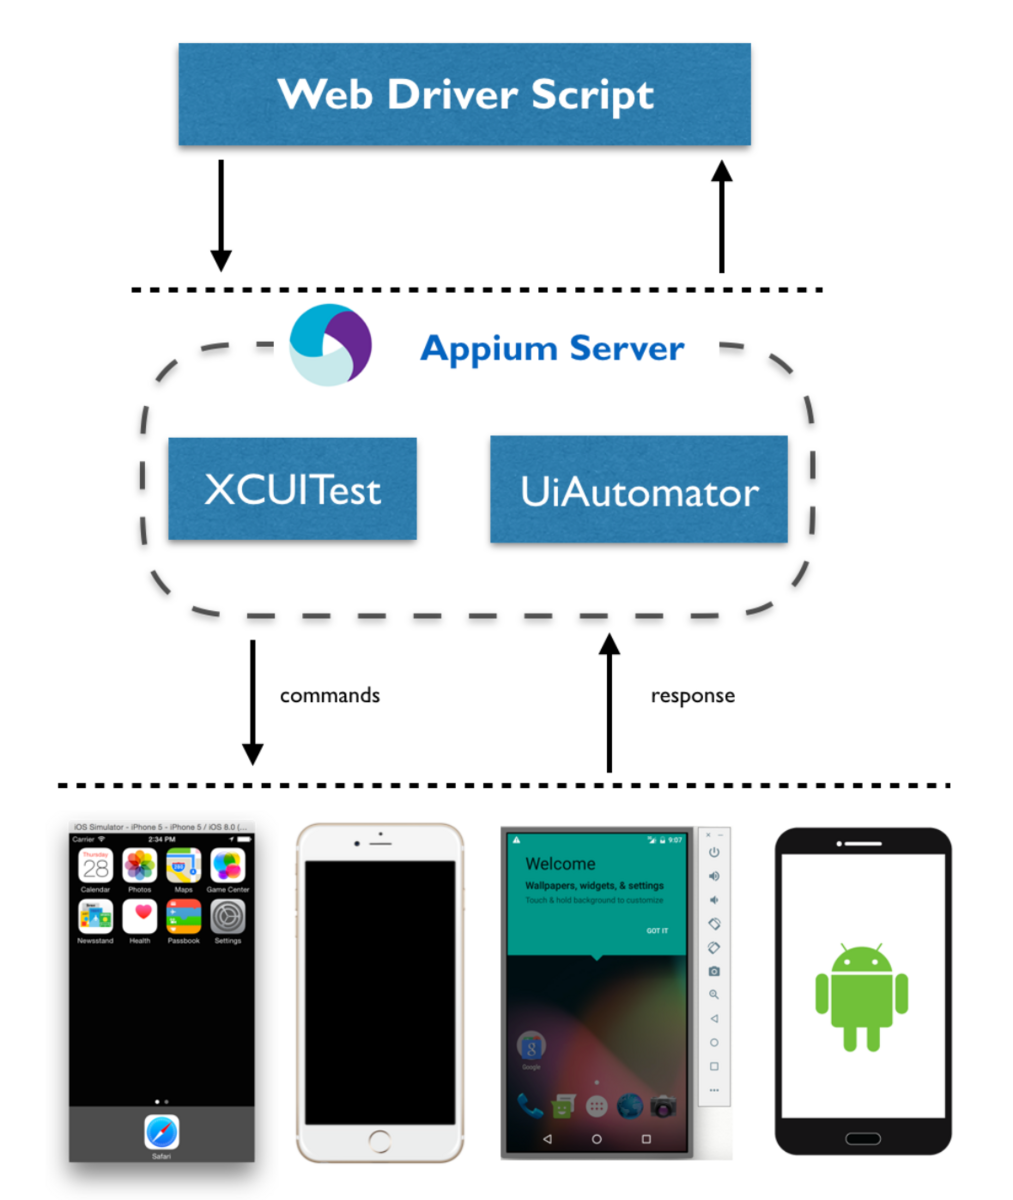
XCUITest is Apple‘s official testing tool, whereas UI Automator is Android’s. Appium is compatible with both, allowing testing on virtually any mobile device.
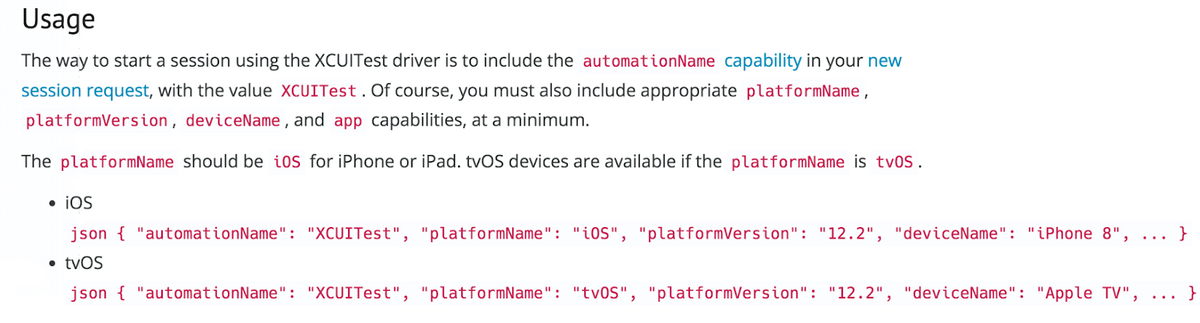
Here’s how Appium is used with XCUITest:
Of course, there are also instructions on the UI Automator integration. You can see that below:
The tool is undoubtedly the most universal mobile testing framework and can be used regardless of your testing environment.
When faced with the advantage this tool can bring you, it’s easy to see how much automation benefits your testing.
To achieve a fully-functioning mobile app, you’d ideally have as few bugs as possible. As such, your testers will need a reliable way to report bugs.
The default method for this is writing a bug report. A comprehensive document, a bug report contains all information helpful for solving the error.
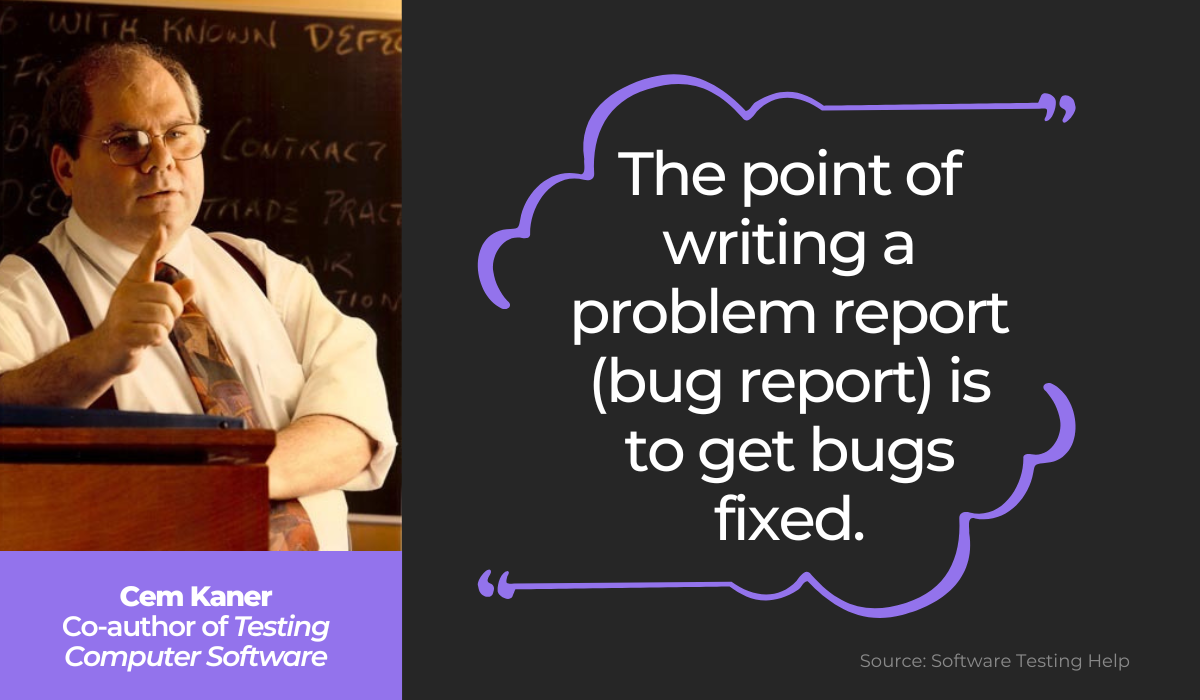
Cem Kaner explained the concept well:
There are certain pieces of data without which a bug report is not helpful. For example, listing only the bug ID will hardly help your developers.
The graph below shows a bug report’s essential elements:
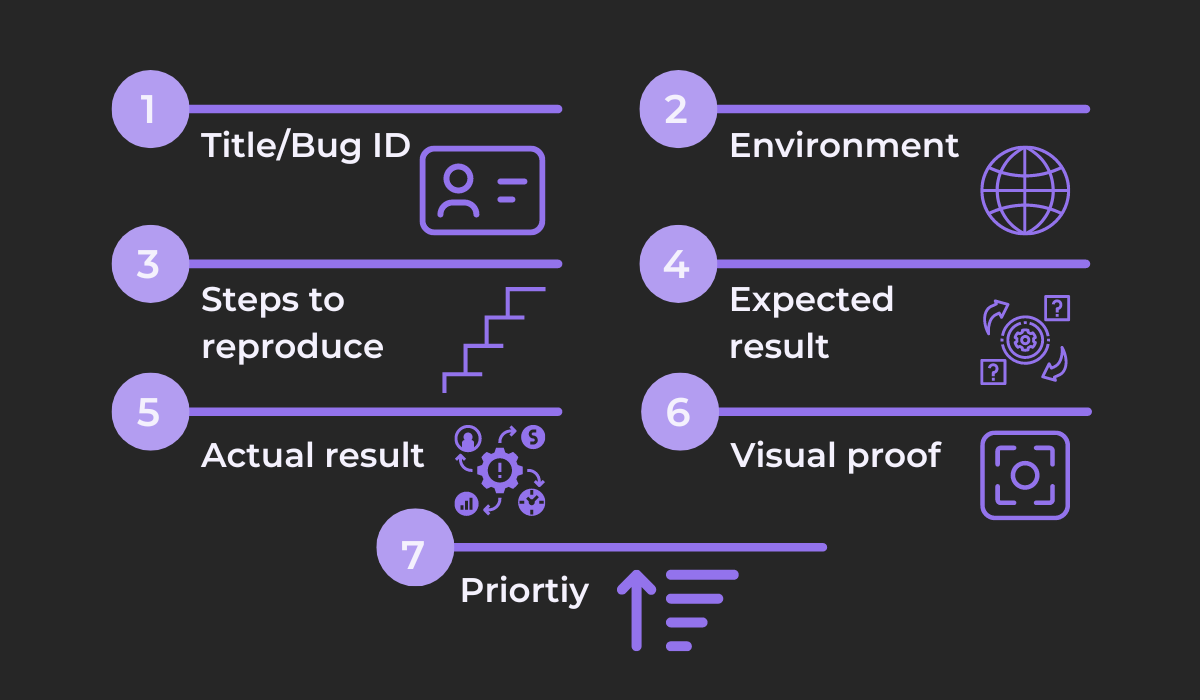
Having an ID or title will significantly facilitate identification, making organization more manageable.
When recording the environment, include specifications such as device type, OS, software version, rate of reproduction, etc.
Steps to reproduce are also necessary, as the developer can then see the bug with their own eyes.
Don’t leave out the expected result either, as this data details how the app is supposed to work—the ideal end-user scenario.
The actual result, on the other hand, describes how the app actually works and the problems the bug caused.
Developers will greatly appreciate screenshots and screen recordings as well since they clearly depict the bug’s actions.
Finally, ensure the bug report also includes priority—a note regarding the seriousness of the bug and when to address it.
All of this being said, you’re in luck—nowadays, there’s no need to write a bug report. Instead, you can simply shake your device.
Shake is a tool that delivers all necessary information by shaking your device—a comprehensive bug report will then immediately be sent to the developers.
Have a look:

The report contains all possible details: screenshots, screen recordings, steps to reproduce the error, network specifications, app version, etc.
With this resource, you can report bugs quickly and thoroughly, giving your developers everything they need.
With Shake, you’ve streamlined a typical bug lifecycle.

Once a bug appears, it can automatically be assigned to a developer without manual human involvement.
This process will facilitate your team members’ workload, as they won’t lose time compiling the bug report.
Furthermore, no vital information will be forgotten.
Manual bug reporting is prone to human error, but with Shake, everything is communicated automatically, so your developers can be confident they have all possible information available.
Once your app is almost ready for development, there’s one final hurdle—testing user acceptance.
Typically the final phase of mobile app testing, user acceptance testing, gathers end-users to trial the app. As such, it’s also called end-user testing.
That way, the app is tested by those who matter most—the end-users.
Ultimately, your app is only profitable if the users are satisfied. User acceptance testing allows you to hear real users’ feedback and therefore makes the app more user-friendly.
For example, a recent survey has revealed the following:
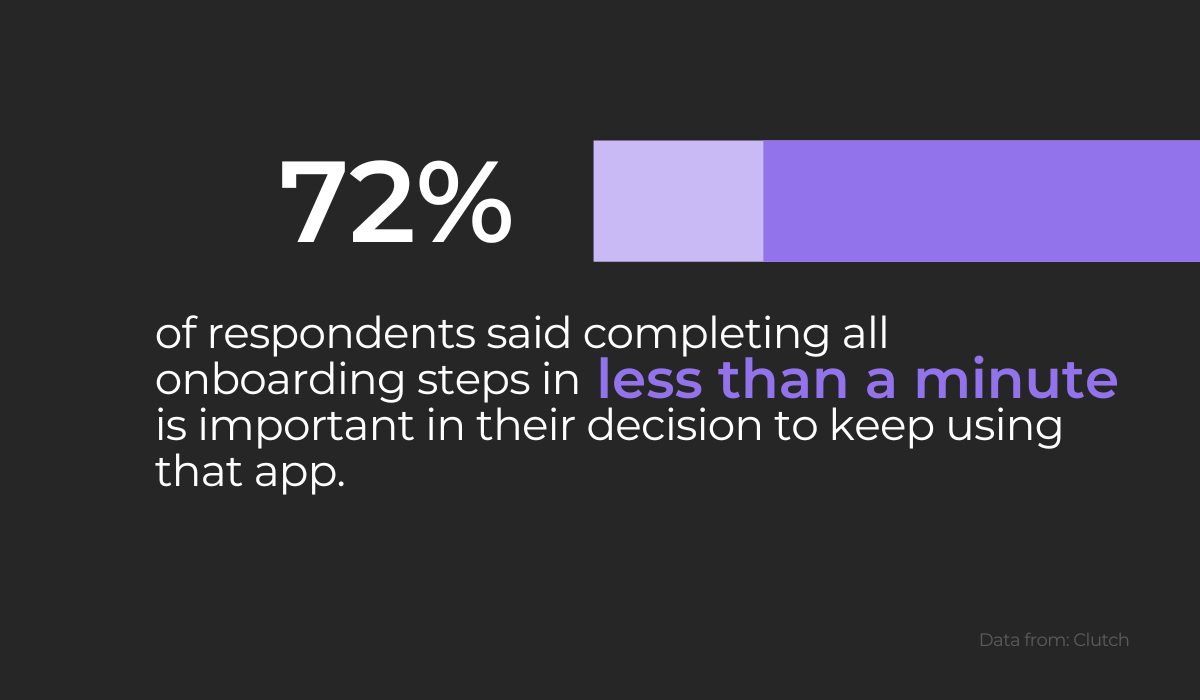
Although you might consider 90 seconds an adequate onboarding time frame, your users think otherwise.
This feedback type makes user testing invaluable, as testers offer advice that might not have crossed your mind.
There are five types of user acceptance testing:
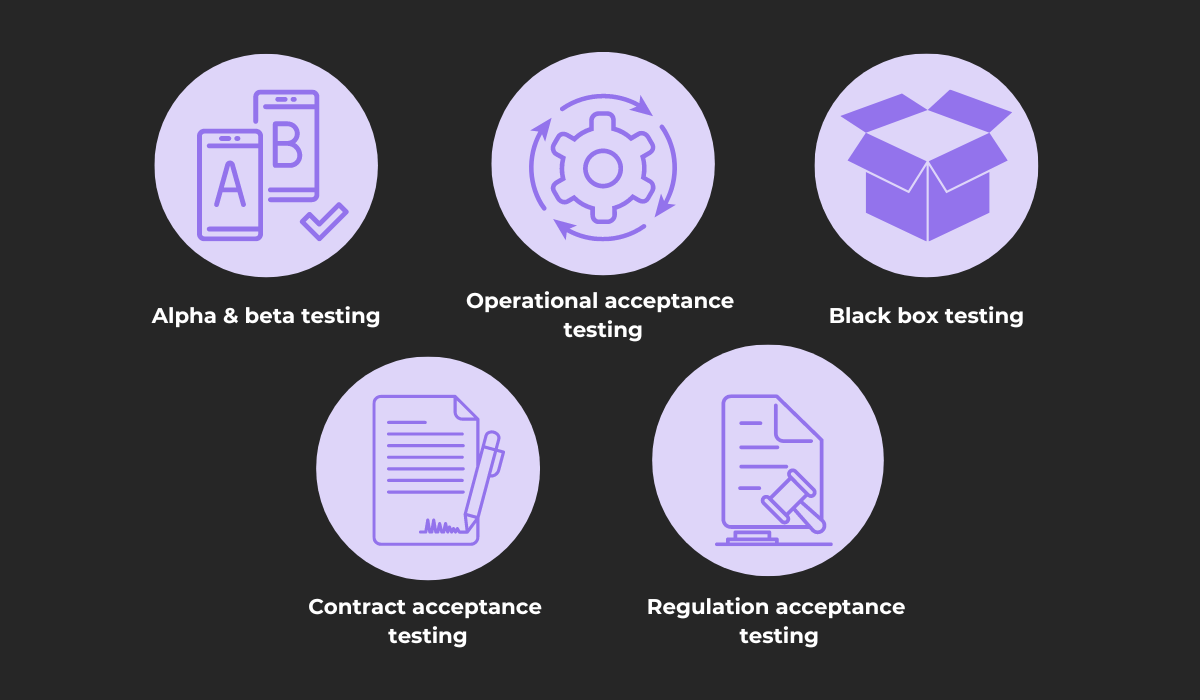
Alpha testing takes place in the development environment and is usually carried out by internal stakeholders at an early stage.
On the other hand, beta testing is done in the customer’s environment and performed by external customers.
As the name suggests, contract acceptance testing verifies that the app meets contract requirements—predefined criteria and specifications.
On the technical side, operational acceptance testing (or production readiness testing) ascertains the app has workflows that enable usage. It’ll double-check backup plans, user training, security checks, etc.
In the legal sphere, regulation acceptance testing ensures the app complies with governmental and legal regulations.
Finally, black box testing has end-users analyze functionalities without any knowledge of the code. The testers only know what the app should do, not how it does it.
That way, they then determine if the requirements are met.
But how do you perform these tests and engage users? Luckily, there are plenty of online resources to assist you.
For example, Maze is a tool that creates tasks for users to complete. You can then discover the app’s strengths and weaknesses based on the testers’ success rate.
Here’s an example:
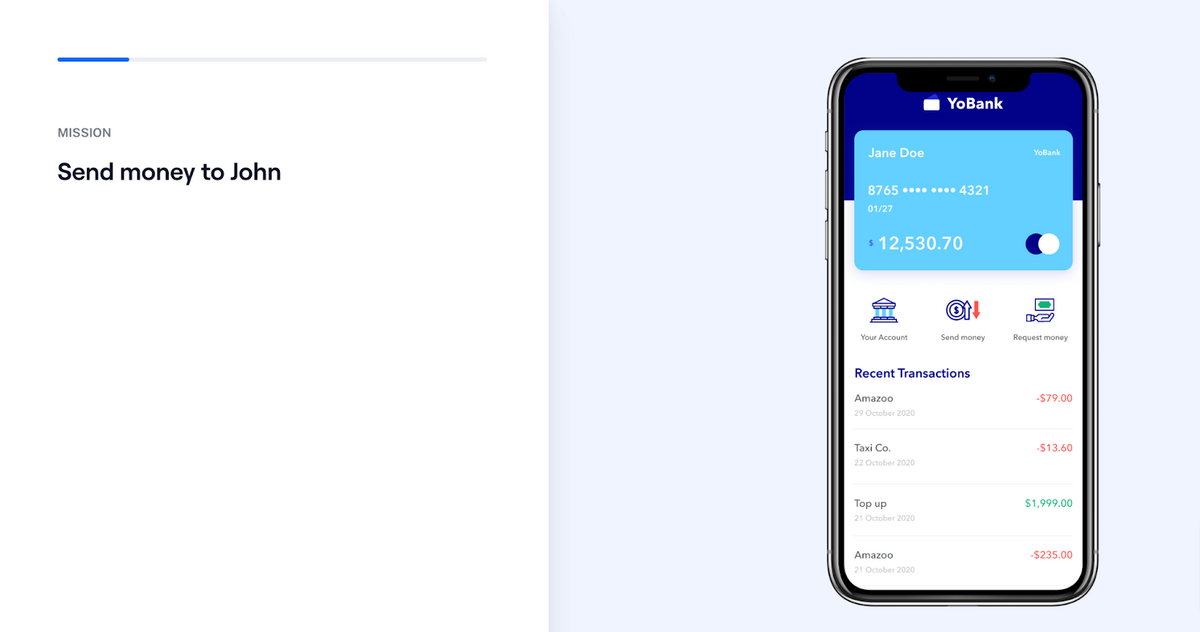
Your users have to send money to John. How they progress and handle this task indicates your app’s overall user-friendliness.
Once you’ve carried out enough tests, you’ll need to also report your findings. If you’re unsure how, don’t worry—you’ll find help online.
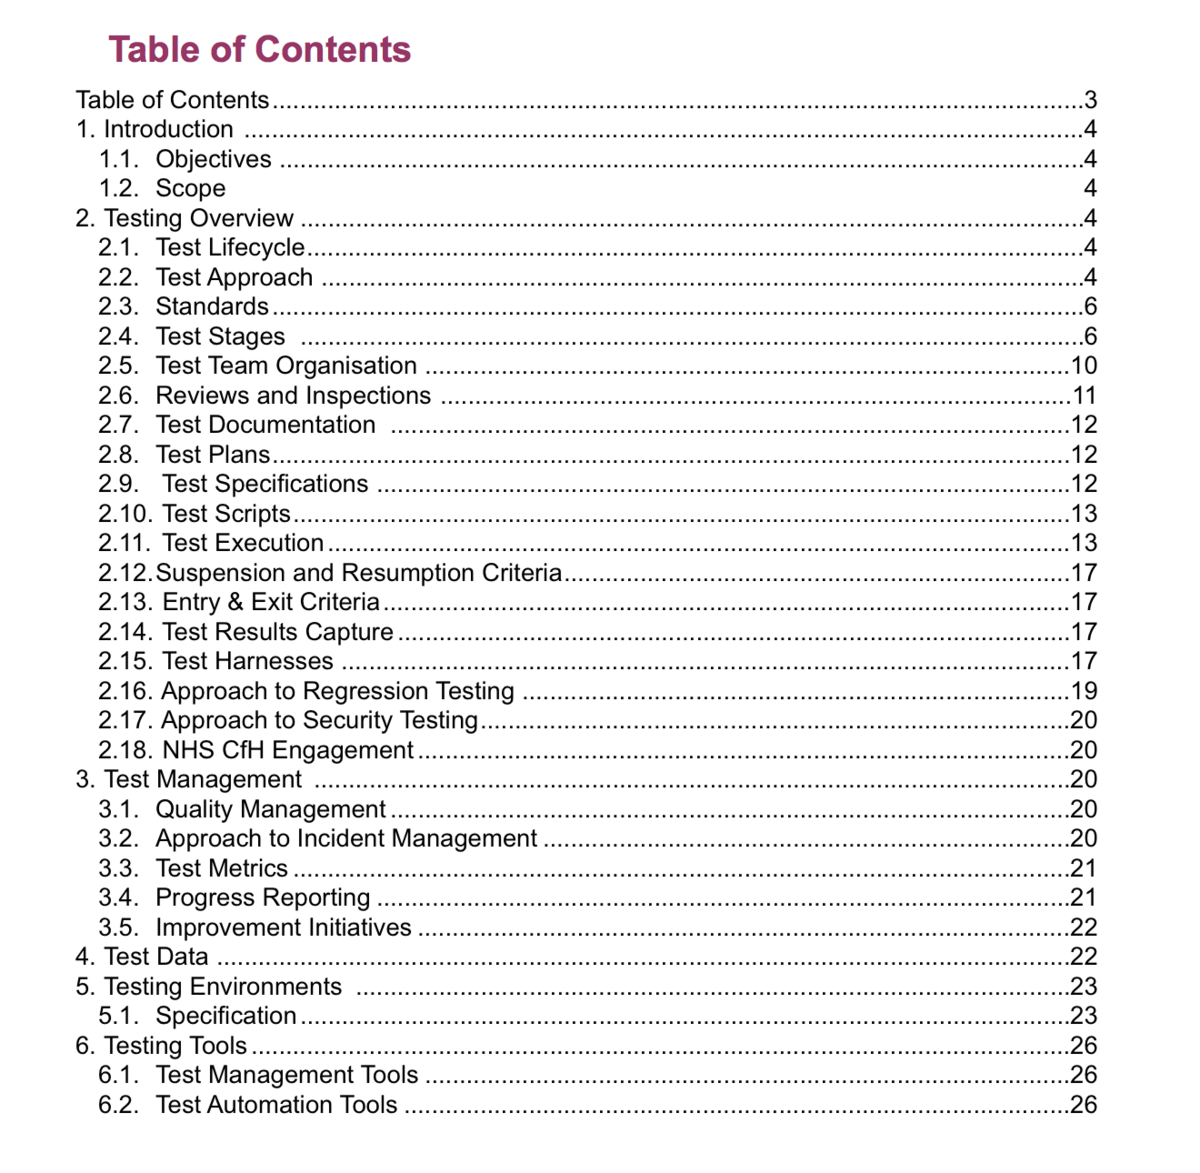
Here’s a user acceptance testing template you can utilize:
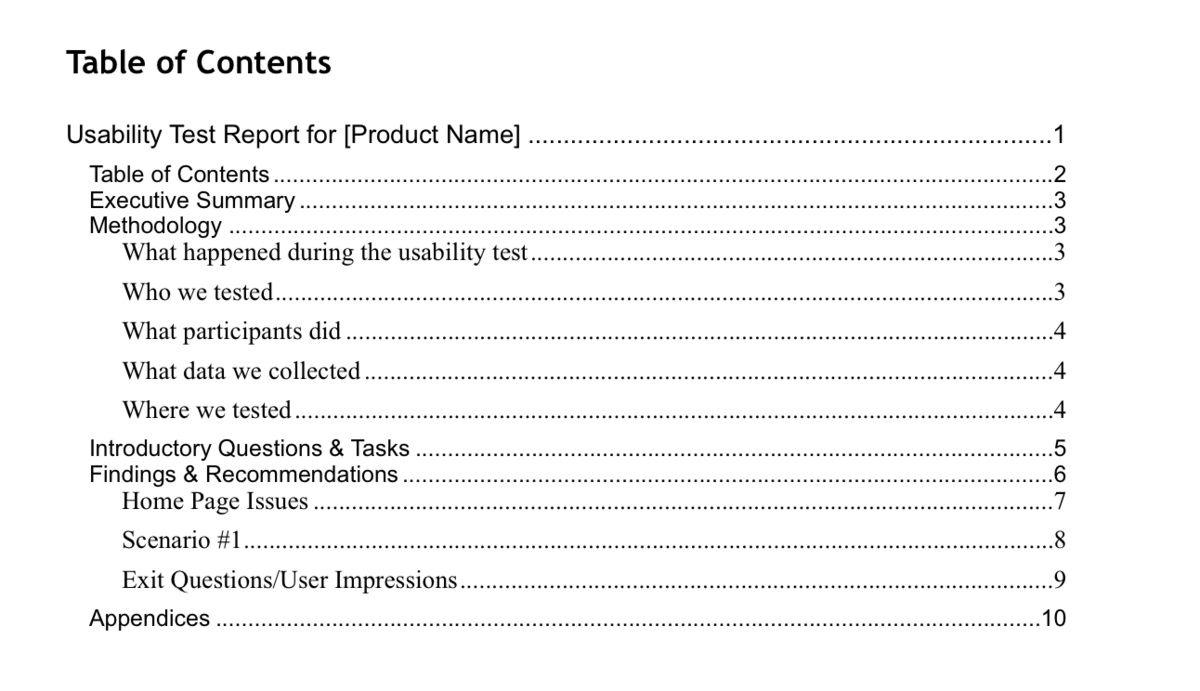
This screenshot shows only the table of contents. The template continues throughout the document, providing guidelines for each specific section.
Once you’re through, you’ll have a comprehensive report on every aspect of your user acceptance testing.
Testing is hugely important when developing your mobile app. Your QA team can verify that everything functions as intended and that your users will have a pleasant user experience.
To get the most out of it, ensure you plan well in advance and begin testing early on.
Automating the testing process is also beneficial, as you’ll take some of the workload off your employees. Furthermore, a reliable way to report bugs is also essential.
Finally, don’t skip out on user acceptance testing—it’s a crucial component of the overall testing process.
Stick to these guidelines, and your mobile app testing will go over seamlessly.
From internal bug reporting to production and customer support, our all-in-one SDK gets you all the right clues to fix issues in your mobile app and website.
We love to think it makes CTOs life easier, QA tester’s reports better and dev’s coding faster. If you agree that user feedback is key – Shake is your door lock.
Read more about us here.

Add to app in minutes

Doesn’t affect app speed

GDPR & CCPA compliant

Unexpected things pop up
Just like bugs in your app or web 🐛 Fix them now with just one reporting tool.