Recommended
How to choose the right mobile app testing tool

Mobile apps are becoming increasingly widespread, with the number of new applications only rising.
In fact, recent studies have revealed that 100,000 apps are released monthly on the Google Play store alone.
However, a mobile app must be thoroughly tested before it can be released, as it ensures the software is free of bugs and can be used normally.
This process has countless steps, and testing can sometimes seem overwhelming.
That’s why we’ve written this article—to provide some tips and tricks that make the mobile testing process easier.
Table of Contents
Testing mobile apps is a complex process.
Testers must trial multiple features while toggling between countless variables (e.g., network, pixel size, screen orientation, etc.)—and that’s without mentioning all the different devices.
How can testers remember all these different scenarios? How can they know they’ve crossed everything off the list?
Well, one method is doing just that: creating a checklist.
A testing checklist is a record of everything testers need to check and is used as a reference point, a way to track their progress.
Here’s a sample checklist:
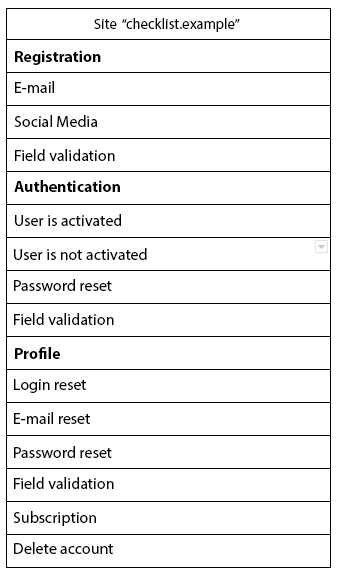
The checklist outlines all the features that must be evaluated, providing testers with an overview of the testing scope they have on their hands.
The above checklist is called a universal checklist—a general checklist containing several basic actions. After all, users register and authenticate themselves on most apps.

Get unreal data to fix real issues in your app & web.
Since universal checklists contain such fundamental attributes, they’re easily used across multiple projects. Just one universal checklist serves as a guide for several apps.
However, such checklists aren’t very detailed, so they’re not precise enough for certain projects. In those situations, using special checklists is better.
The visual below describes the difference:
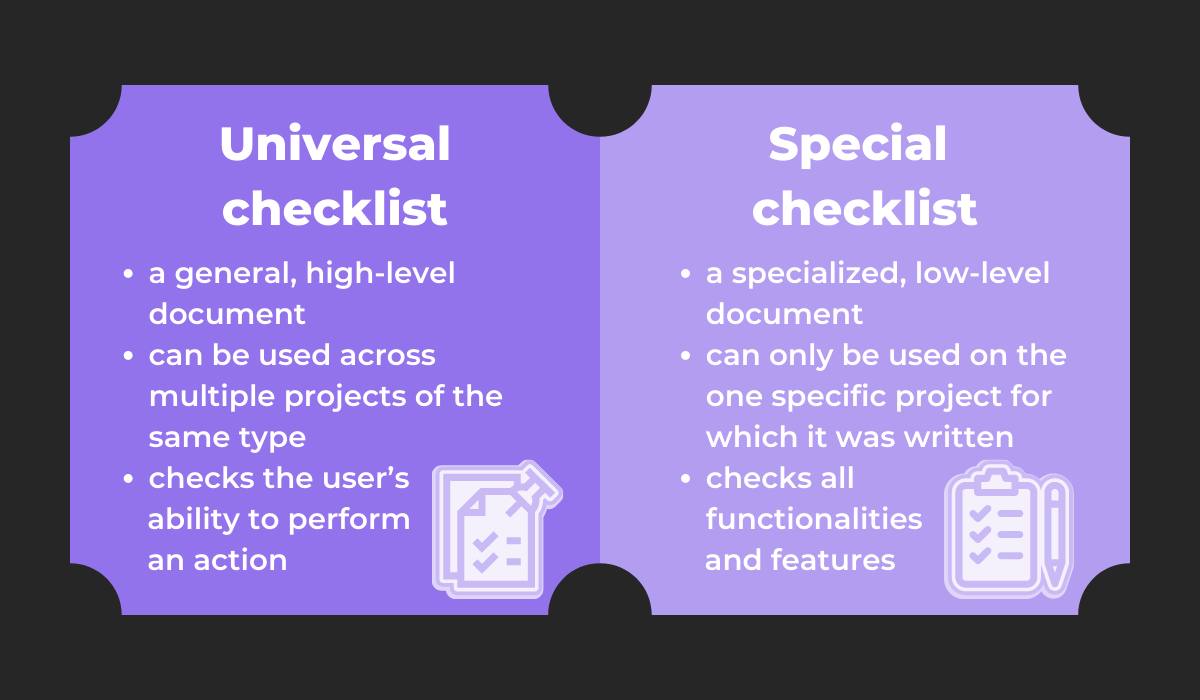
Special checklists are designed for one particular project and are highly specialized.
For an example of their specific requirements, look at this sample special checklist:
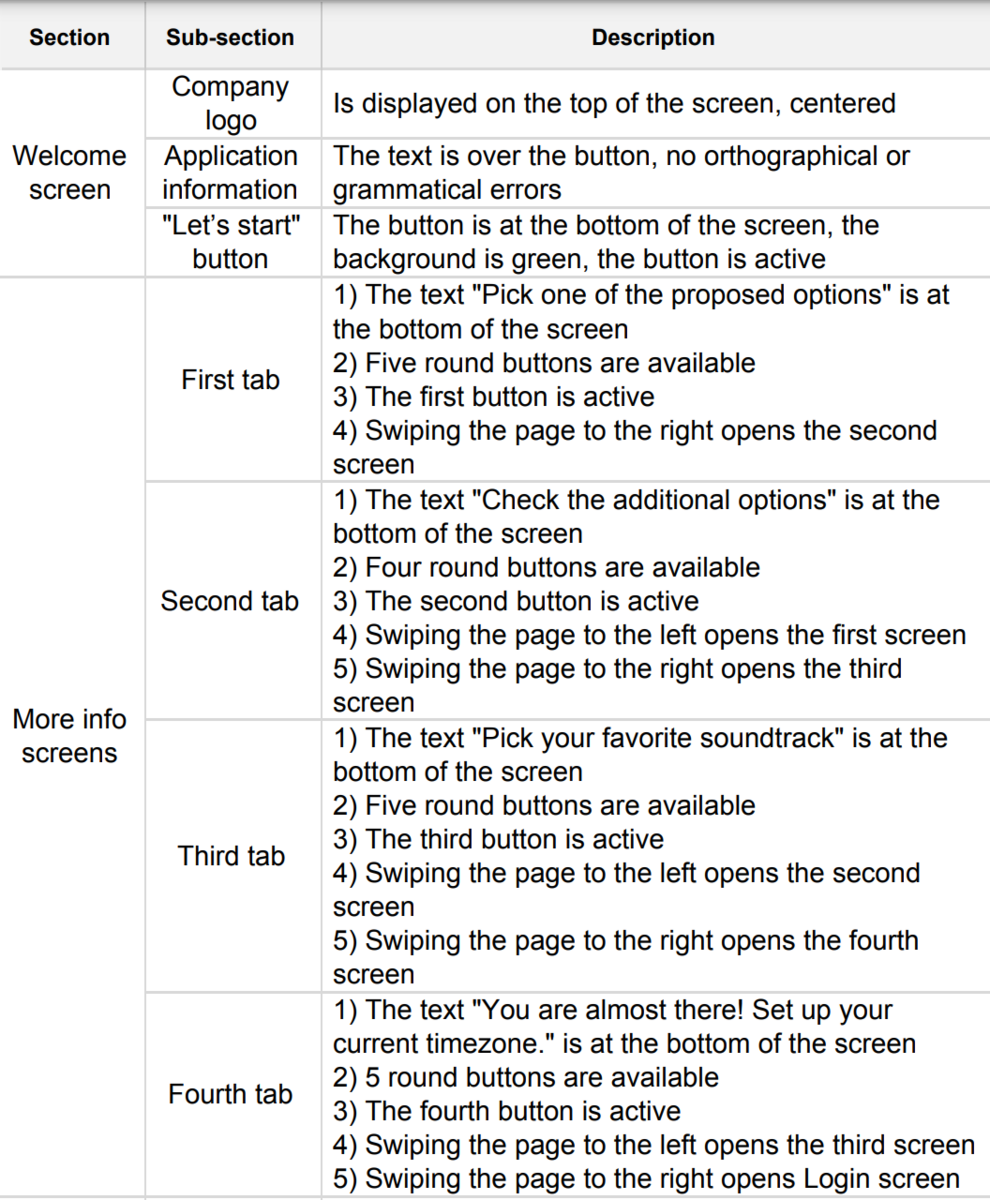
This level of detail ensures the checklist can only be used for one project. The items are simply too unique to be reused.
The checklist you choose depends on the number of projects. If you currently only have two projects, creating two comprehensive special checklists is probably worthwhile.
Conversely, if you expect five or more projects, universal checklists will likely be more effective long term.
Whatever approach you select, develop the checklist yourself and avoid merely downloading a template or copying another organization. Feyza Dayan, a senior testing developer, explains why:
When creating a checklist, I recommend doing it specifically for your project and application. Because there may be differences between the e-commerce application and the applications that include payment systems, etc.
An e-commerce application is not the same as payment systems applications, nor is it synonymous with any other app type.
Your application is your own unique product, and what’s important for other organizations isn’t necessarily relevant to your software.
So, devise and follow a testing checklist essential to your application and no one else’s—it’s sure to pay off.
Although testing checklists are an effective method to ensure your testers trial everything needed, not every company can afford the time to compose one (especially those with smaller QA teams).
Such companies can instead turn to informal yet effective methods. For example, why not try testing mnemonics?
Mnemonics are a learning technique that helps remember information through association. In mobile app testing, testers use them to remember the software elements they need to evaluate.
For example, consider the following mnemonic:
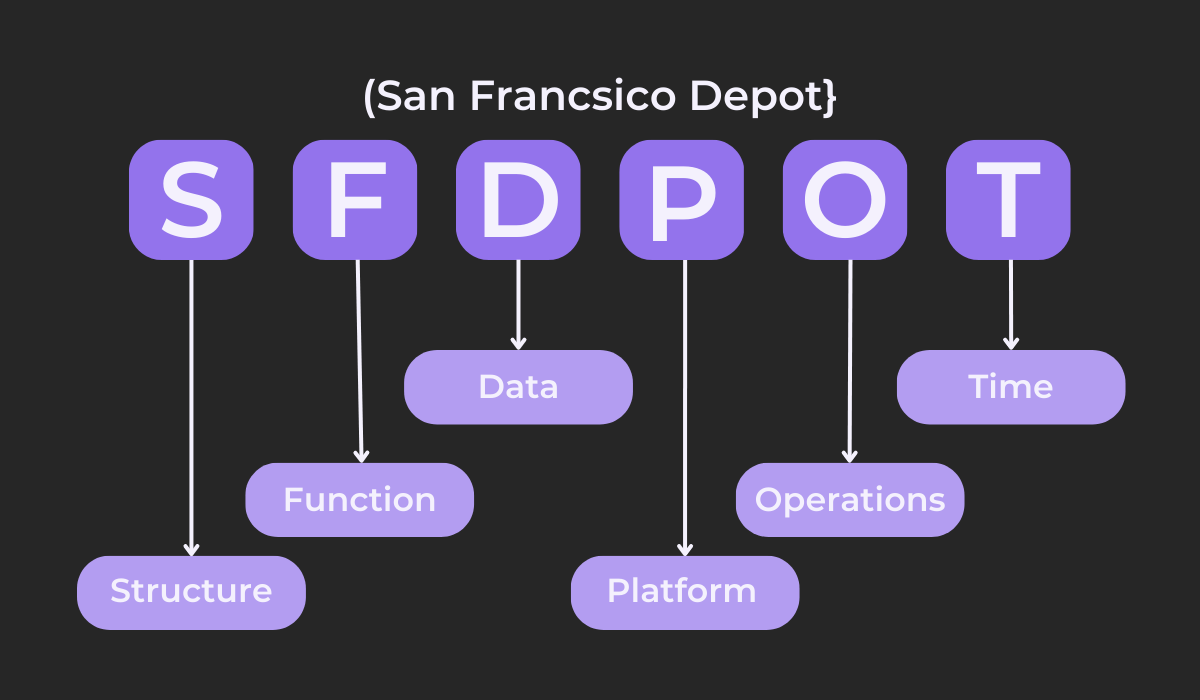
SFDPOT (or San Francisco Depot) is a popular mnemonic that guides testers through mobile app testing fundamentals, as each letter represents a crucial testing component.
For example, structure refers to what the app is made of, whereas platform references what it depends on (e.g., location services).
Similarly, functions suggests testing what the app does, and operations alludes to how users use it.
Data is also a huge concern, and some apps are sensitive to time and various time zones.
SFDPOT provides general testing guidelines that testers can apply to most applications. However, there are also specialized mnemonics designed for particular testing types.
Here’s one such example:
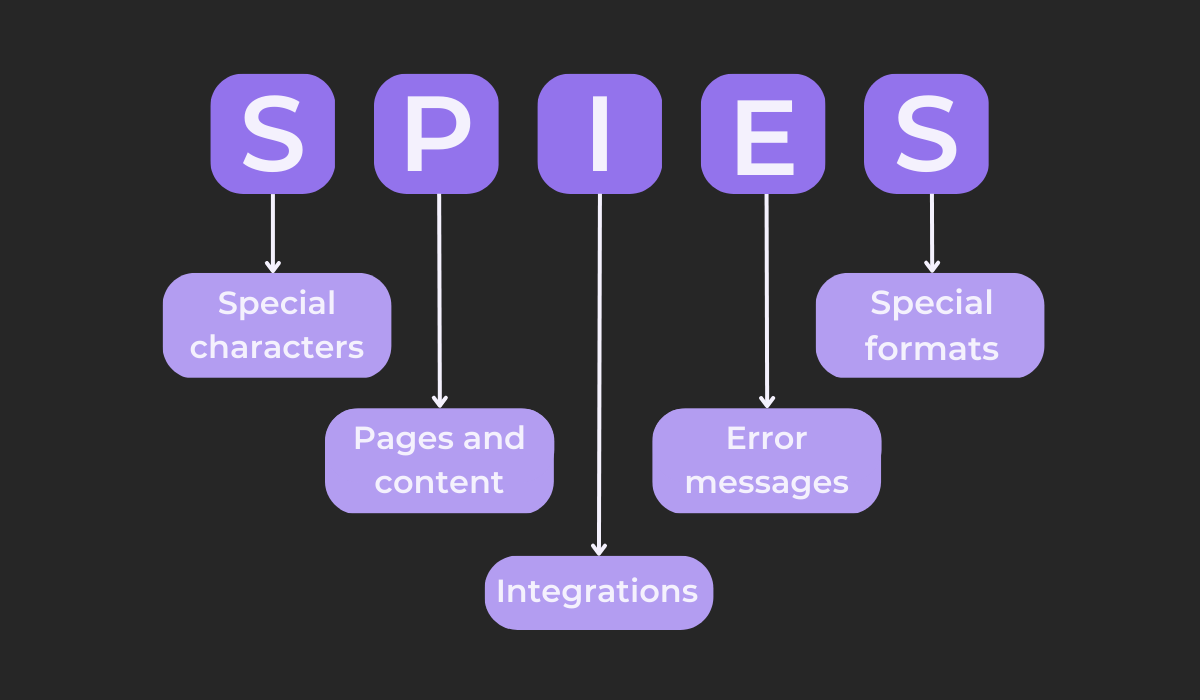
It’s important for your app to be able to handle special linguistic characters along with specific date and time formats. Here, the double S refers to those features.
Pages and content cover translation, double-checking if the meaning is the same across languages. Since translating error messages is particularly tricky, the E singles them out.
Furthermore, integrated systems are often overlooked when testing translation. Here, the I ensures that doesn’t happen.
SPIES and SFDPOT are both short mnemonics with fairly clear-cut meanings. However, there are also longer mnemonics that often serve as the basis for a detailed testing strategy.
For example, look at this mnemonic:
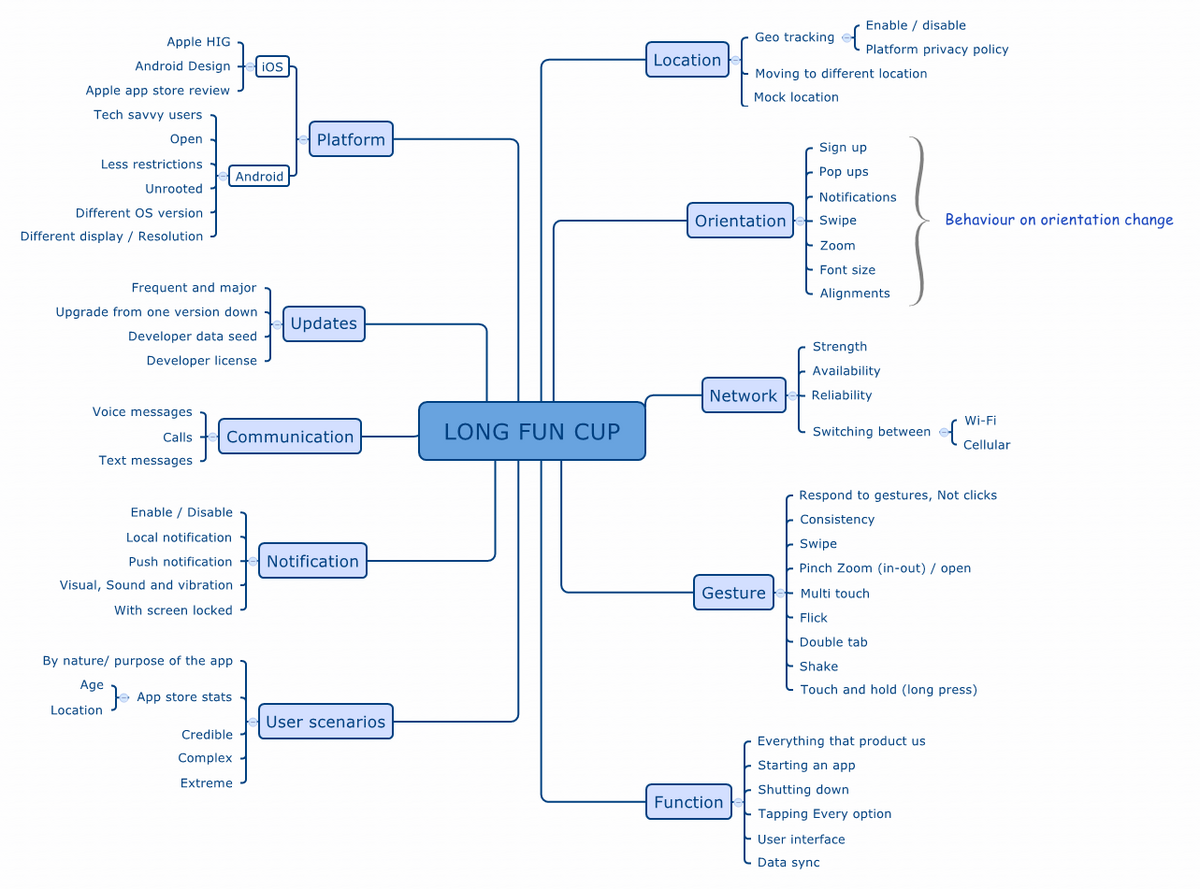
Tester Dhanasekar Subramaniam took the mnemonic LONG FUN CUP and developed a comprehensive testing approach, breaking down each word the letters stand for into subcategories.
The ensuing result is an exhaustive list of all necessary testing components.
Why not try the same? With this method, your testers will have explicit testing guidelines—all thanks to one fun, silly testing mnemonic you used to develop a comprehensive testing strategy,
The mnemonic we talked about in the previous section—LONG FUN CUP—was the basis for a thorough testing strategy.
Each letter’s signified word was expanded into relevant subheadings so that every term was connected to a parent or child term. The final result was a sort of mind map.
Such mind maps are helpful because they’re grouped by category. Each general topic is broken down into a related sub-topic, creating subject clusters that function as testing guidelines.
Consequently, mind maps essentially function as illustrations of everything that needs to be tested. They provide testers with an organized overview of their testing scope.
When developing a mind map, place your main testing goal as the starting point (the center). From there, create subcategories that help you achieve this goal.
Here’s a sample of such an approach:
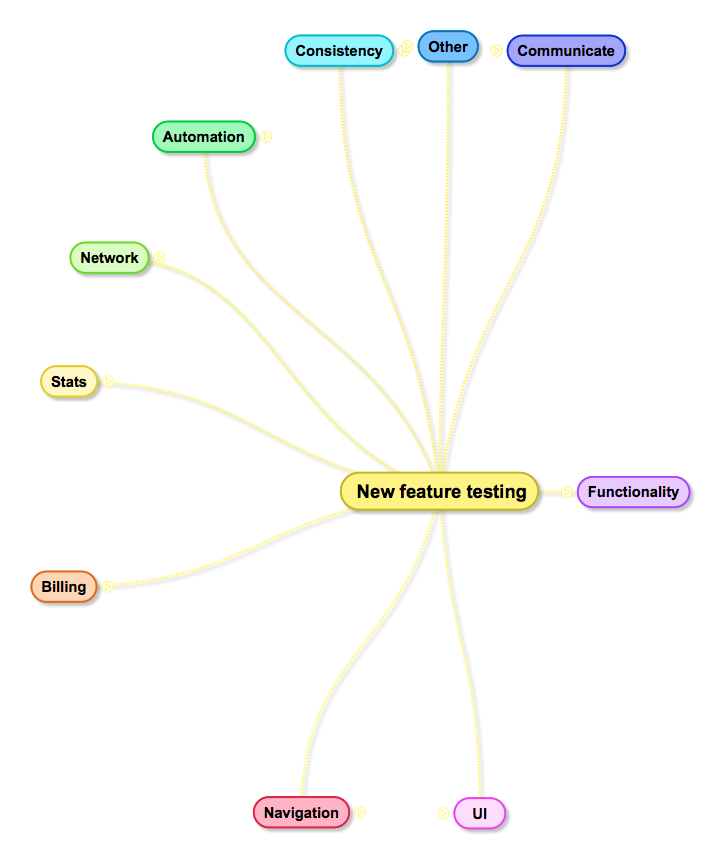
Each branch category contributes to the primary objective. However, these branches can be further broken down into subcategories for a more detailed illustration.
Here’s how that would look for functionality:
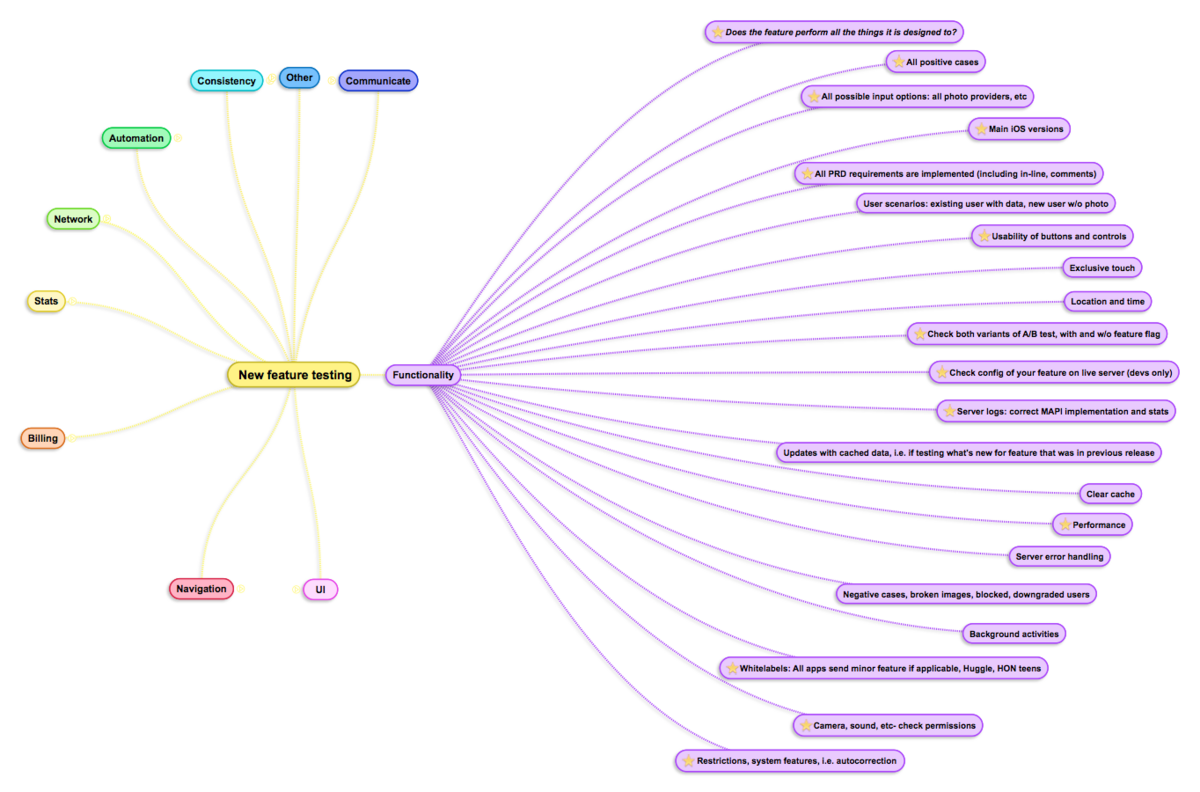
The mind map can easily grow into a detailed yet widespread overview of all your testers’ tasks. With this visual, they’ll know exactly what needs to be tested.
Furthermore, the above image only expanded the functionality category. However, the map would be even more comprehensive if you expounded on every topic in the same way.
Here’s an excellent example of a fully-developed mind map:
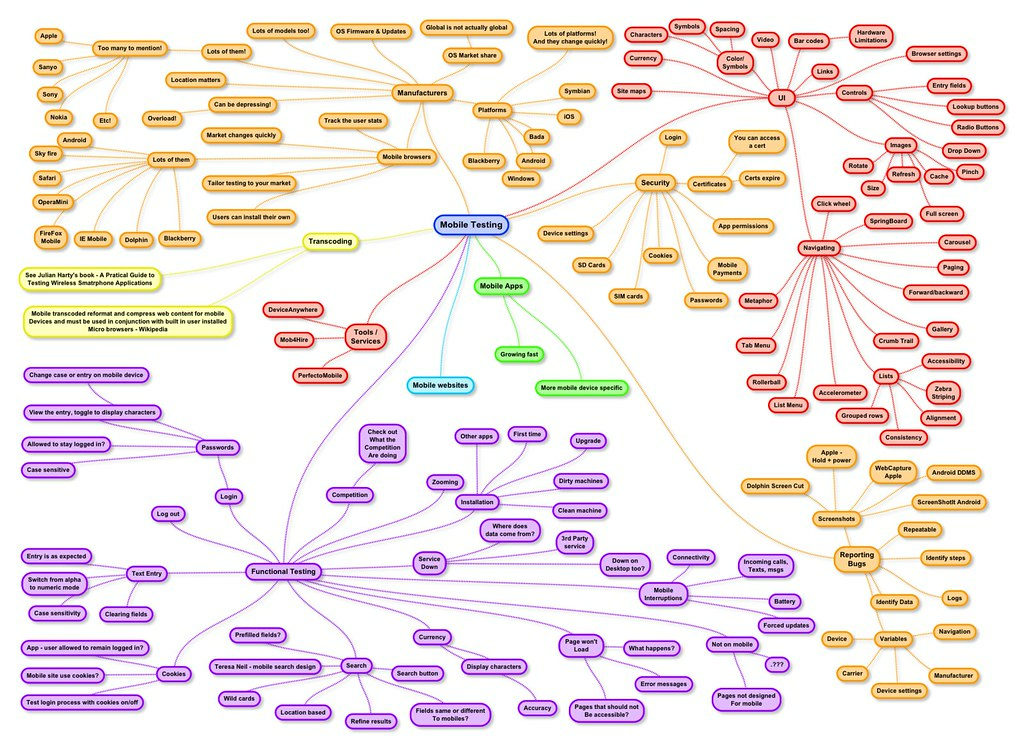
There’s no end to a mind map’s possible topics and sub-topics. With such a detailed illustration, there’s no chance your testers will miss out on any testing aspect.
Given the level of detail, you don’t want to draw mind maps on a whiteboard or use a pen and paper. Such comprehensive illustrations require more sophisticated tools.
For example, Coggle is a handy online resource that allows you to produce beautiful collaborative mind maps.
With this tool, your entire team can easily create and use these illustrations.
Here’s a brief preview of the tool:
Your testers are sure to benefit from such a tool, as it allows them to quickly create detailed and attractive mind maps—a huge help when performing mobile app testing.
Just because your app works perfectly on the latest iOS version doesn’t mean it will perform equally well on Android devices.
Different devices have different specifications, and to ensure a fully functional app, you must test it across multiple devices.
Of course, this is easier said than done. Collecting multiple physical devices is challenging storage-wise, and you’ll only have so much budget at your disposal.
One solution is to acquire the most popular devices in your target market’s location. Instead of investing in every device variant, you simply gather the most sought-after models.
Luckily, you won’t have to do any research yourself. Perfecto has already uncovered the most popular devices per geographical region.
Here are their findings for North America:
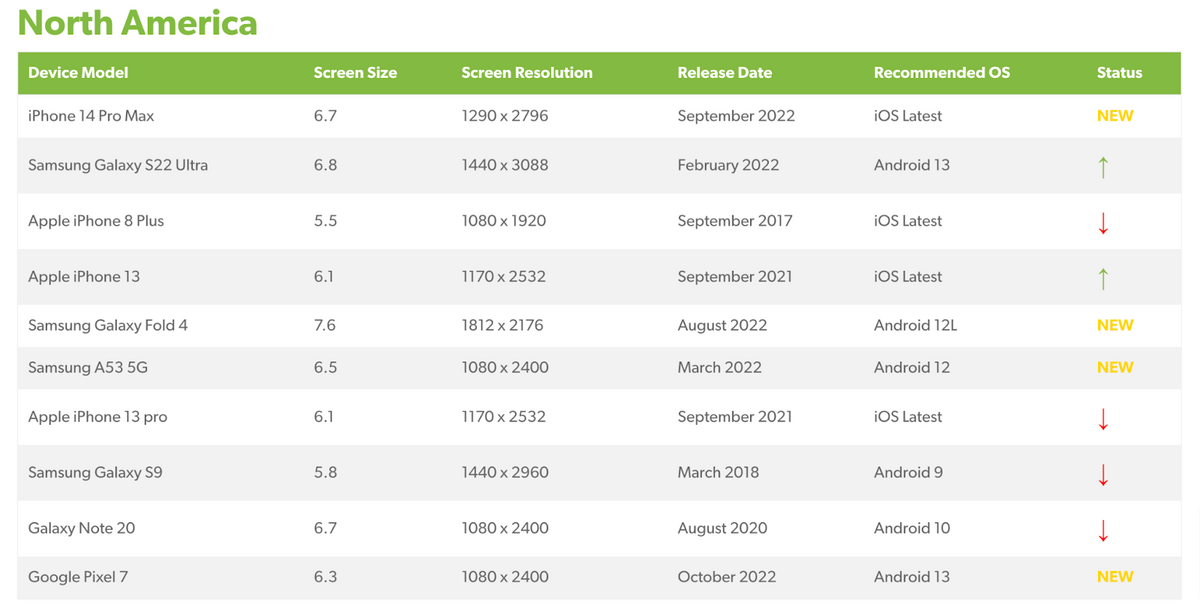
Perfecto also compiled lists for other locations. With these guides, you can quickly pinpoint your region’s most popular devices and focus your testing on them.
However, if you want to be as thorough as possible, and have access to all devices, try investing in cloud-based device services.
These services offer countless real devices hosted on the cloud, which can be utilized for testing.
However, instead of physically holding them in their hands, testers simply control them via the cloud.
Here’s the process with Amazon AWS:

Amazon AWS’s Device Farm is a popular cloud-based solution. The resource even allows you to filter your device choices via make and OS version, so you’ll definitely find a suitable device.
That being said, such cloud-based services are often costly. For a more economical alternative, it’s worth looking into emulators.
Emulators are programs that mimic devices’ hardware and software on your workstation. They create virtual devices by copying guest devices’ architecture.
Such a process is much easier to set up and maintain than consistently hosting real devices.
In addition, you’ll have extended controls such as adjusting the battery state, geolocation, and more.
Here’s what the Android emulator looks like:
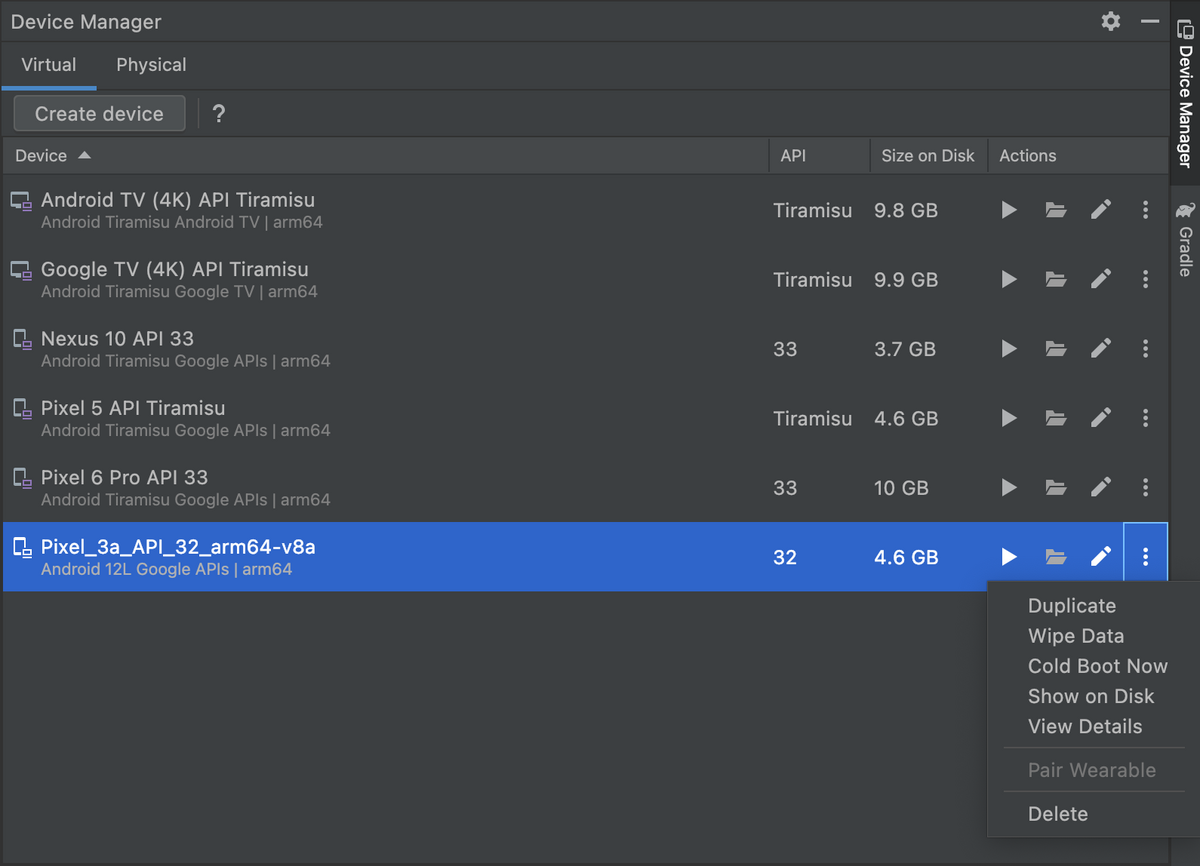
This is a sample virtual device bank where you can view and manage your emulator-generated devices.
As you can see, the possibilities are endless, and you can mimic any device on the market.
Mobile app testing can take a lot of time, as countless tasks must be repeatedly performed. Consider regression testing and smoke testing—both require a regular schedule.
However, it’s not necessarily testers who must execute these tests. Why not have your machines do it?
Generally speaking, it’s best to automate as much as possible, as you free up time for your testers.
That being said, there are specific tests that can’t or shouldn’t be automated. The visual below provides an overview:
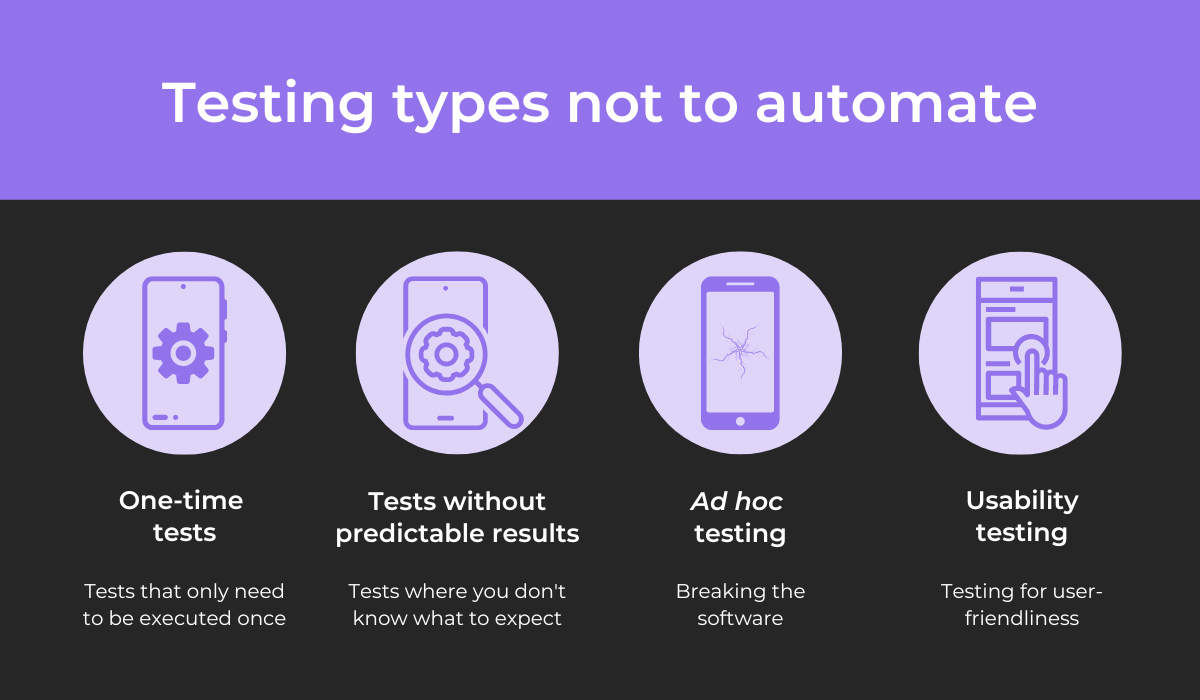
Automation is costly to set up, so there’s not much sense in automating one-time tests.
Furthermore, automation is best when you know what to expect. If you’re not anticipating a particular outcome, human eyes should overview the entire process.
Similarly, only humans can conduct ad hoc testing—breaking the application. Testers perform random, unstructured actions to see how the app reacts to unusual activity.
Finally, usability testing is also impossible to automate, as it depends solely on human cognition.
These four testing types shouldn’t be automated, but all other variants are suitable automation candidates.
To implement such automation, it’s worth investing in an automation tool like Appium, a one-stop solution for Android and iOS.
Here’s how the tool works:
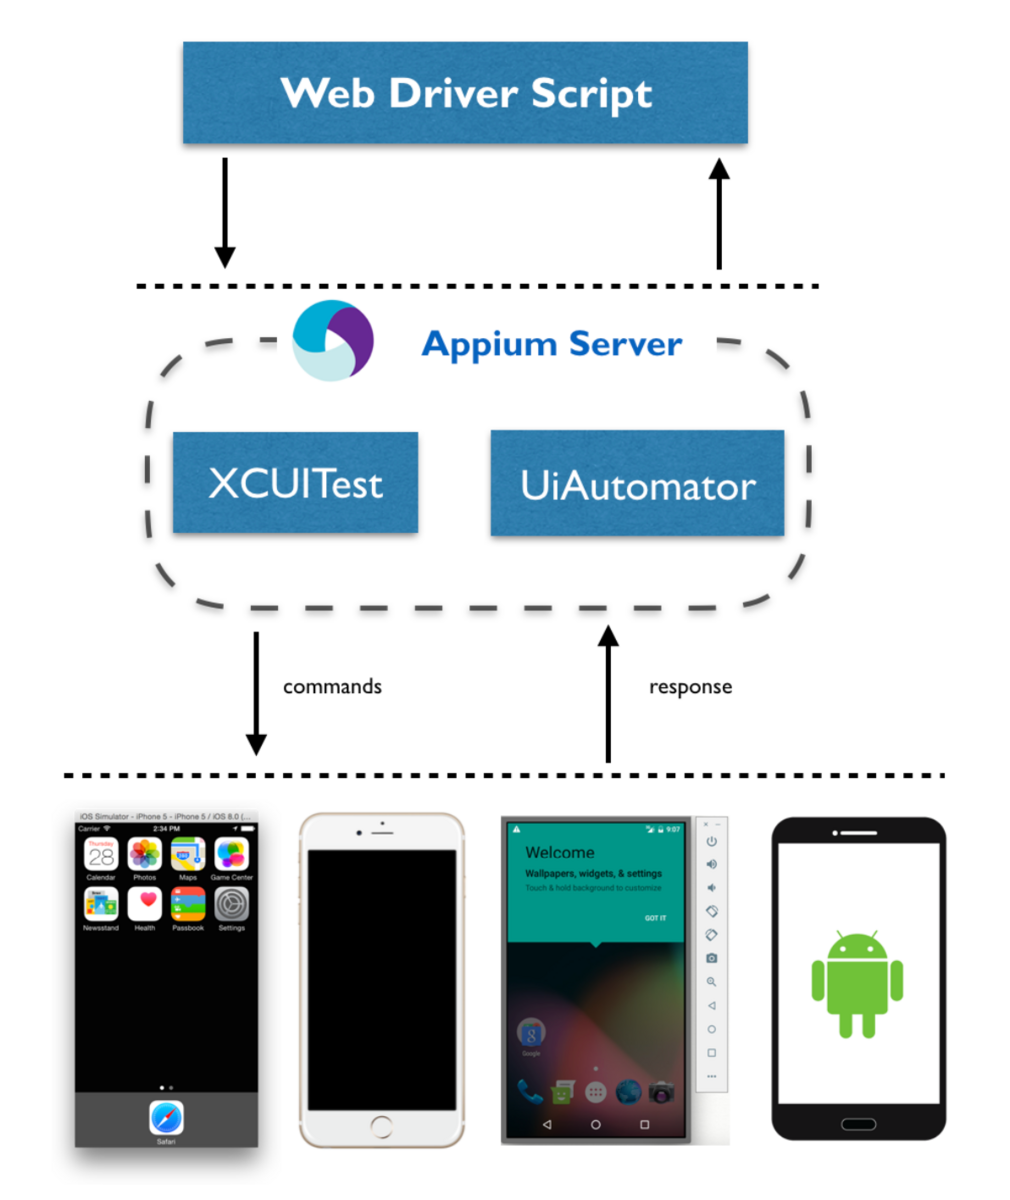
The user puts in the commands, and the platform’s server converts them into a format that the native test framework will accept.
For Android, that framework is UIAutomator, and for iOS, it’s XCUITest. In other words, the commands are executed in the tested application inside an emulator.
However, testing isn’t the only QA activity you can automate. Software testing is performed to uncover software defects, which testers then report.
Bug reporting is typically a lengthy process, as developers require extensive information for debugging. However, the process is easily automated with a bug reporting tool like Shake.
Simply shake your mobile device, and a comprehensive bug report will automatically be sent to the developers.
Here’s a sample bug report:
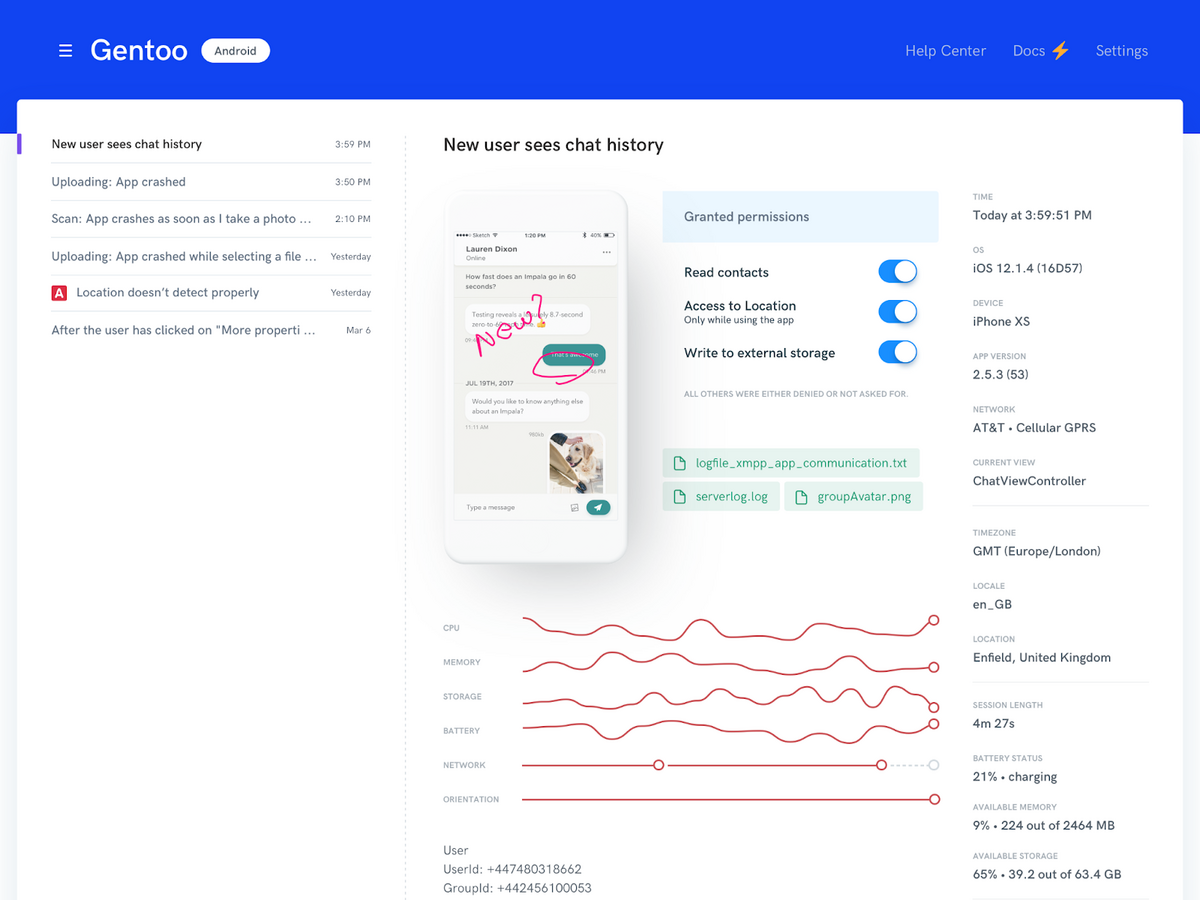
The bug report contains everything developers need: environment details, logs, screenshots and screen recordings, and more.
With this tool, your testers can submit bug reports automatically, significantly accelerating your employees’ workflows.
Mobile app testing is invaluable in app development, as it verifies that everything is working well. Testing will catch any software bugs and ensures a smooth release,
However, the process is quite an undertaking and can sometimes seem overwhelming. Luckily, there are a few methods that can help you out.
For example, automating operations will relieve some of your testers’ workload, and a detailed checklist provides a thorough reference point regarding your testing scope.
With a few handy methodologies, your testing process will become much easier, and you’ll finish mobile app testing in no time at all.
From internal bug reporting to production and customer support, our all-in-one SDK gets you all the right clues to fix issues in your mobile app and website.
We love to think it makes CTOs life easier, QA tester’s reports better and dev’s coding faster. If you agree that user feedback is key – Shake is your door lock.
Read more about us here.

Add to app in minutes

Doesn’t affect app speed

GDPR & CCPA compliant

Unexpected things pop up
Just like bugs in your app or web 🐛 Fix them now with just one reporting tool.